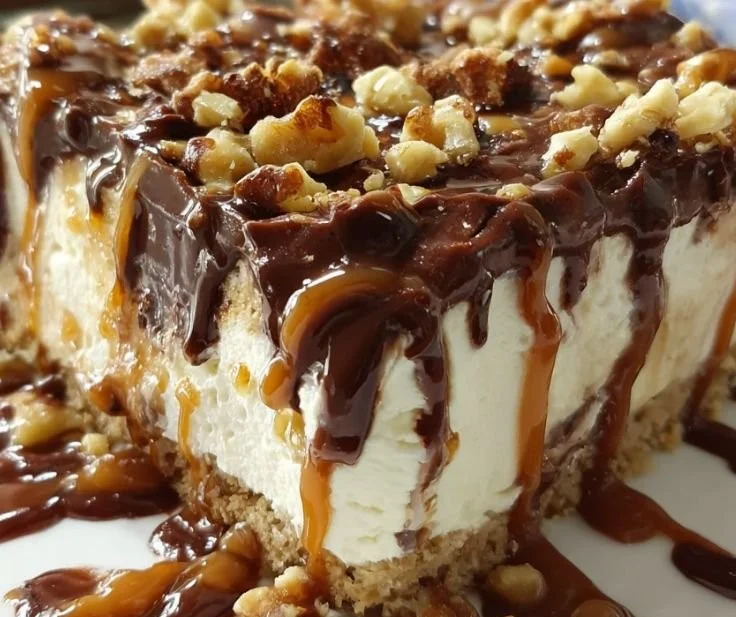
There’s something exceptionally delightful about ice cream that takes us back to cherished childhood memories. I can almost hear the laughter of kids running around during summer barbecue parties, the sound of ice cream trucks in the distance, and the joy of biting into a cone, letting the cool goodness melt away as the sun bakes down. This Drumstick Ice Cream Cake encapsulates that nostalgic feeling, turning the classic ice cream cone into a deliciously layered dessert that everyone can enjoy. Prepare to take a trip down memory lane while indulging in layers of creamy vanilla ice cream, rich chocolate fudge, and crunchy peanuts, all beautifully wrapped in a cookie-crisp crust.
Recipe Timing
- Prep Duration: 15 minutes
- Active Cooking: 10 minutes
- Total Duration: About 4 hours (including freezing time)
- Portion Size: Serves 8-10
- Complexity: Simple
Nutritional Recipe
- Calories per portion: Approximately 350 kcal
- Protein: 6 g per serving
- Carbs: 44 g per serving
- Fats: 18 g per serving
- Fiber: 2 g per serving
- Sugars: 27 g per serving
- Sodium: 200 mg per serving
Why You’ll Love This Drumstick Ice Cream Cake
Imagine a warm summer day, the sun shining bright, and the comforting taste of ice cream. This Drumstick Ice Cream Cake embodies all that joy in one decadent slice. It’s simple enough to make on a whim, and the best part? You can customize it to suit your cravings! Whether you love extra chocolate, more nuts, or a layer of your favorite fruity ice cream, this cake can be tailored to please everyone at your gathering.
The Complete Cooking Journey
Let’s dive into the deliciousness that is Drumstick Ice Cream Cake. The process is straightforward: from crunching up those sugar cones to creating the perfect layer of fudge, each step brings us closer to a refreshing dessert that will leave everyone begging for seconds. This dessert is not just a crowd-pleaser; it’s a memory-maker, an occasion enhancer, and the sweetest way to say goodbye to summer.
Ingredients
- 2 cups vanilla ice cream
- 1 cup chocolate fudge sauce
- 1 cup crushed peanuts
- 1 cup sugar cones, crushed
- 1/2 cup butter, melted
- 1 cup whipped cream
- Chocolate curls or additional peanuts for garnish (optional)
Method:
Step 1: Preheat the Oven
Preheat your oven to 350°F (175°C).
Step 2: Create the Crust
In a bowl, mix the crushed sugar cones with melted butter until well combined. Press this mixture into the bottom of a greased cake pan, forming a delightful crust.
Step 3: Bake the Crust
Bake the crust in the preheated oven for 10 minutes, then let it cool completely.
Step 4: Prepare the Ice Cream Layer
Spread the vanilla ice cream evenly over the cooled crust and freeze for about 2 hours or until solid.
Step 5: Add the Fudge Sauce and Peanuts
Once the ice cream is firm, spread the chocolate fudge sauce over it, and sprinkle the crushed peanuts on top.
Step 6: Add Another Layer of Ice Cream
Add another layer of vanilla ice cream on top of the fudge and peanuts, then freeze again for at least 2 hours.
Step 7: Garnish Before Serving
Before serving, top the cake with whipped cream and garnish with chocolate curls or additional peanuts if desired.
Step 8: Serve and Enjoy!
Slice the cake, serve chilled, and watch as everyone digs in delightfully!
Serving Suggestions & Pairings
This Drumstick Ice Cream Cake is fabulous on its own, but you can elevate your presentation by pairing it with fresh berries or a drizzle of warm chocolate sauce. Serve alongside a chilled glass of milk or a rich cup of coffee for a delightful treat that satisfies both young and old alike.
Storage & Leftovers Guide
Leftover Drumstick Ice Cream Cake can be stored in the freezer, covered tightly with plastic wrap or foil. It will maintain its delightful taste and texture for about two weeks – but trust me, it won’t last that long!
Kitchen Wisdom & Success Tips
- For the creamiest ice cream layer, ensure that the first layer of vanilla ice cream is well-softened before spreading it, as this helps it spread evenly.
- Be generous with the fudge and nuts; they add wonderful texture and flavor!
- If you want to get creative, consider mixing in some caramel sauce or different flavored ice creams for added fun.
Flavor Variations & Adaptations
Feeling adventurous? Try swapping out the vanilla ice cream for chocolate or mint chocolate chip for a twist! You could even add crushed cookies or fruit for a unique flavor profile. The possibilities are endless!
Reader Questions & Solutions
Q1: My crust turned out too hard. What did I do wrong?
A: If the crust is too hard, try reducing the baking time or mixing in a bit more melted butter to keep it softer.
Q2: Can I use store-bought ice cream?
A: Absolutely! Using your favorite store-bought ice cream can save time and still ensure a delicious result.
Q3: How can I prevent the ice cream from melting too quickly when serving?
A: Keep the cake in the freezer until just before serving, and slice quickly to keep the ice cream from melting.
Q4: What if I can’t find sugar cones?
A: You can substitute graham crackers or even crushed cookies to create a delicious crust!
Q5: Can I make this ahead of time?
A: Yes! This cake can be made a few days prior. Just keep it frozen until you are ready to serve.
Wrapping Up
Nothing beats the joy of creating desserts that spark laughter and happy memories, and this Drumstick Ice Cream Cake is sure to join the ranks of your favorite recipes. It’s easy, fun, and delicious – a perfect addition to any summer gathering or simply a sweet treat for yourself. So grab your ingredients, summon your loved ones, and embark on a delightful adventure in your kitchen. Happy cooking!
PrintDrumstick Ice Cream Cake
A nostalgic layered dessert featuring vanilla ice cream, chocolate fudge, and crunchy peanuts, all in a cookie-crisp crust.
- Prep Time: 15 minutes
- Cook Time: 10 minutes
- Total Time: 240 minutes
- Yield: 8-10 servings 1x
- Category: Dessert
- Method: Freezing
- Cuisine: American
- Diet: Vegetarian
Ingredients
- 2 cups vanilla ice cream
- 1 cup chocolate fudge sauce
- 1 cup crushed peanuts
- 1 cup sugar cones, crushed
- 1/2 cup butter, melted
- 1 cup whipped cream
- Chocolate curls or additional peanuts for garnish (optional)
Instructions
- Preheat the oven to 350°F (175°C).
- Mix the crushed sugar cones with melted butter until well combined. Press into the bottom of a greased cake pan.
- Bake the crust for 10 minutes, then let it cool completely.
- Spread the vanilla ice cream evenly over the cooled crust and freeze for about 120 minutes or until solid.
- Add the chocolate fudge sauce over the ice cream, then sprinkle the crushed peanuts on top.
- Add another layer of vanilla ice cream on top of the fudge and peanuts, then freeze again for at least 120 minutes.
- Top the cake with whipped cream and garnish with chocolate curls or additional peanuts before serving.
- Slice the cake, serve chilled, and enjoy!
Notes
For best results, make sure the ice cream is softened before spreading to maintain a smooth layer.
Nutrition
- Serving Size: 1 slice
- Calories: 350
- Sugar: 27g
- Sodium: 200mg
- Fat: 18g
- Saturated Fat: 10g
- Unsaturated Fat: 8g
- Trans Fat: 0g
- Carbohydrates: 44g
- Fiber: 2g
- Protein: 6g
- Cholesterol: 25mg