As the sun begins to shine and the air fills with the promise of spring, my thoughts drift to one of my favorite holiday traditions: baking Italian Easter Cookies. These delightful treats are not just any cookies; they are a symbol of celebration and joy, often crafted with love and care in households across Italy and the world. Every time I bake these cookies, I’m transported back to my grandmother’s kitchen, where the aroma of freshly baked goods mingled with the laughter of family gathered together. It’s a nostalgic journey that fills my heart with warmth and a sense of belonging—and I can’t wait to share this experience with you.
## Recipe Timing
- Prep Duration: 15 minutes
- Active Cooking: 12 minutes
- Total Duration: 27 minutes
- Portion Size: About 24 cookies
- Complexity: Simple
## Nutritional Recipe
- Calories per portion: Approximately 150 calories
- Protein: 2g
- Carbs: 21g
- Fats: 7g
- Fiber: 0g
- Sugars: 10g
- Sodium: 35mg
## Why You’ll Love These Italian Easter Cookies
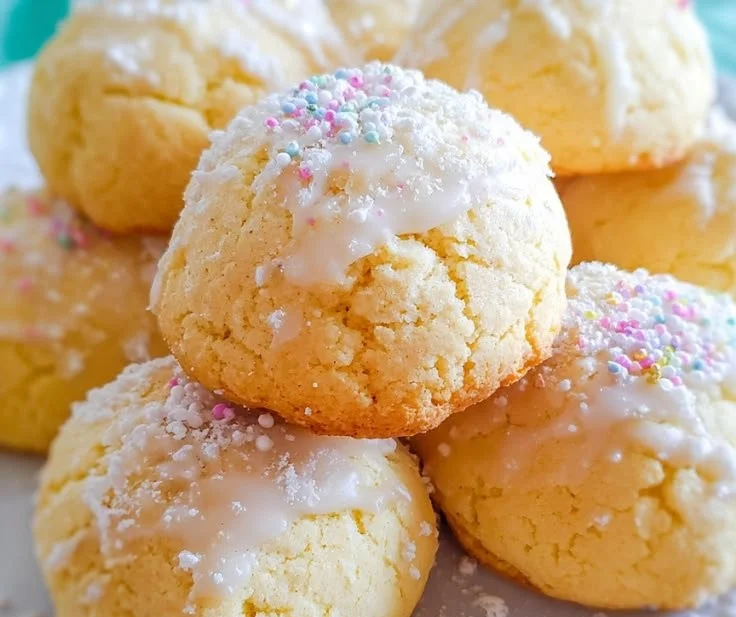
These Italian Easter Cookies are tender, buttery bites with just the right amount of sweetness, finished with a glossy glaze and colorful sprinkles that bring them to life. Each cookie is a canvas for creativity and love, perfect for sharing at family gatherings or simply to celebrate the joys of spring. Whether you’re a seasoned baker or a beginner, these cookies are easy to make and will fill your kitchen with the sweet scent of nostalgia. Plus, they are a fun way to introduce little ones to baking—imagine their excitement decorating these cookies together!
## The Complete Cooking Journey
This cookie journey starts with a simple texture—a soft dough that comes together beautifully. As you mix the butter and sugar, watch as it transforms into a fluffy cloud of sweetness. The moment you fold in the fragrant extracts of vanilla and almond, you’ll know that these cookies are something special. Once baked, they turn a lovely golden hue, and the glaze drizzled on top is the perfect final touch. Each bite is a reminder of the joy of sharing food with loved ones—a true celebration of life and tradition.
## Ingredients:
- 2 cups all-purpose flour
- 1 teaspoon baking powder
- 1/4 teaspoon salt
- 1/2 cup unsalted butter, softened
- 3/4 cup granulated sugar
- 2 large eggs
- 1 teaspoon vanilla extract
- 1/2 teaspoon almond extract
- For the glaze:
- 1 cup powdered sugar
- 2 tablespoons milk
- 1/2 teaspoon vanilla extract
- Colorful sprinkles for topping
## Method:
### Step 1: Preheat the Oven
Preheat your oven to 350°F (175°C). Grease a baking sheet or line it with parchment paper to prepare for baking these delightful cookies.
### Step 2: Whisk the Dry Ingredients
In a bowl, whisk together the flour, baking powder, and salt until well combined. This helps ensure that your cookies will have even texture and rise beautifully.
### Step 3: Cream the Butter and Sugar
In another bowl, beat together the softened butter and sugar until light and fluffy. This will provide your cookies with a soft, rich base that melts in your mouth.
### Step 4: Add the Eggs and Extracts
Add the eggs to the butter-sugar mixture, along with the vanilla extract and almond extract. Mix until well combined, creating a creamy, aromatic batter.
### Step 5: Combine Dry and Wet Ingredients
Gradually add the dry ingredients to the wet mixture, blending just until combined. Be careful not to overmix; you want to keep that tender cookie texture!
### Step 6: Scoop the Dough
Using a tablespoon, drop spoonfuls of dough onto the prepared baking sheet, spacing them about 2 inches apart. This will allow them to spread nicely as they bake.
### Step 7: Bake the Cookies
Bake in the preheated oven for 10-12 minutes, or until the edges are lightly golden. The aroma will begin to fill your kitchen, drawing everyone’s attention!
### Step 8: Cool the Cookies
Allow the cookies to cool completely on a wire rack. This step is crucial for ensuring your cookies hold their shape before glazing.
### Step 9: Mix the Glaze
In a bowl, combine the powdered sugar, milk, and vanilla extract until smooth. This glossy glaze will be the crowning touch for your cookies.
### Step 10: Drizzle the Glaze
Drizzle the glaze over the cooled cookies, allowing it to set slightly. Get creative with your drizzling technique—it’s all part of the fun!
### Step 11: Sprinkles Galore
Top the glazed cookies with colorful sprinkles to give them a festive look. These sprinkles not only add flavor but also a pop of delight to every bite!
## Serving Suggestions & Pairings
These Italian Easter Cookies are perfect on their own but are even better when paired with a warm cup of coffee or tea—ideal for an afternoon treat! You might also consider serving them as part of a larger dessert table during Easter celebrations alongside traditional Italian desserts like colomba or panettone.
## Storage & Leftovers Guide
To keep your cookies fresh, store them in an airtight container at room temperature for up to a week. For longer storage, consider freezing the baked cookies. Just place them in a freezer-safe bag, and they can last up to three months. When you’re ready to enjoy them, simply thaw at room temperature for a sweet taste of spring!
## Kitchen Wisdom & Success Tips
- Make sure your butter is at room temperature for easier creaming.
- If your dough feels too sticky, you can chill it for about 30 minutes before scooping—it helps them hold their shape better.
- Experiment with different flavored extracts! Lemon or orange zest can add a zesty twist to the classic flavor.
## Flavor Variations & Adaptations
Feel free to swap the almond extract for other flavors, such as coconut or lemon. You can also mix in chocolate chips or dried fruit for an extra special touch. Want to make them gluten-free? Substitute the all-purpose flour with a suitable gluten-free blend.
## Reader Questions & Solutions
-
Why did my cookies spread too much?
- Make sure the butter is just softened, not melted. Also, check that you’re using the correct amount of flour.
-
Can I freeze the cookie dough?
- Absolutely! You can scoop the dough onto a tray, freeze them, then store them in an airtight container for future baking.
-
What if my glaze is too thick?
- Add a tiny bit more milk to thin it out until you reach your desired consistency.
-
How can I make these cookies more colorful?
- Use fun food coloring in the glaze or more colorful sprinkles for an extra festive look!
-
Can I replace eggs in the recipe?
- Yes, for each egg, you can substitute with 1/4 cup of unsweetened applesauce or a flax egg (1 tablespoon ground flaxseed mixed with 2.5 tablespoons water).
## Wrapping Up
Baking these Italian Easter Cookies is more than just making a sweet treat; it’s an experience filled with love, memories, and a hint of spring magic. So gather your ingredients, roll up your sleeves, and get ready to create cookies that will not only delight your taste buds but also warm your heart. May these cookies bring joy to your home and be shared with those you love most. Happy baking!
PrintItalian Easter Cookies

Delightful Italian Easter Cookies that are tender, buttery bites with a sweet glaze and colorful sprinkles.
- Prep Time: 15 minutes
- Cook Time: 12 minutes
- Total Time: 27 minutes
- Yield: 24 cookies 1x
- Category: Dessert
- Method: Baking
- Cuisine: Italian
- Diet: Vegetarian
Ingredients
- 2 cups all-purpose flour
- 1 teaspoon baking powder
- 1/4 teaspoon salt
- 1/2 cup unsalted butter, softened
- 3/4 cup granulated sugar
- 2 large eggs
- 1 teaspoon vanilla extract
- 1/2 teaspoon almond extract
- 1 cup powdered sugar (for glaze)
- 2 tablespoons milk (for glaze)
- 1/2 teaspoon vanilla extract (for glaze)
- Colorful sprinkles for topping
Instructions
- Preheat your oven to 350°F (175°C). Grease a baking sheet or line it with parchment paper.
- Whisk together the flour, baking powder, and salt in a bowl.
- Cream the softened butter and sugar until light and fluffy.
- Add the eggs, vanilla extract, and almond extract, mixing until well combined.
- Combine the dry ingredients with the wet mixture, blending just until combined.
- Scoop spoonfuls of dough onto the baking sheet, spacing them about 2 inches apart.
- Bake for 10-12 minutes or until the edges are lightly golden.
- Cool the cookies completely on a wire rack.
- Mix the powdered sugar, milk, and vanilla extract until smooth for the glaze.
- Drizzle the glaze over the cooled cookies.
- Top with colorful sprinkles.
Notes
For a creative twist, try different flavored extracts or add chocolate chips.
Nutrition
- Serving Size: 1 cookie
- Calories: 150
- Sugar: 10g
- Sodium: 35mg
- Fat: 7g
- Saturated Fat: 4g
- Unsaturated Fat: 2g
- Trans Fat: 0g
- Carbohydrates: 21g
- Fiber: 0g
- Protein: 2g
- Cholesterol: 30mg