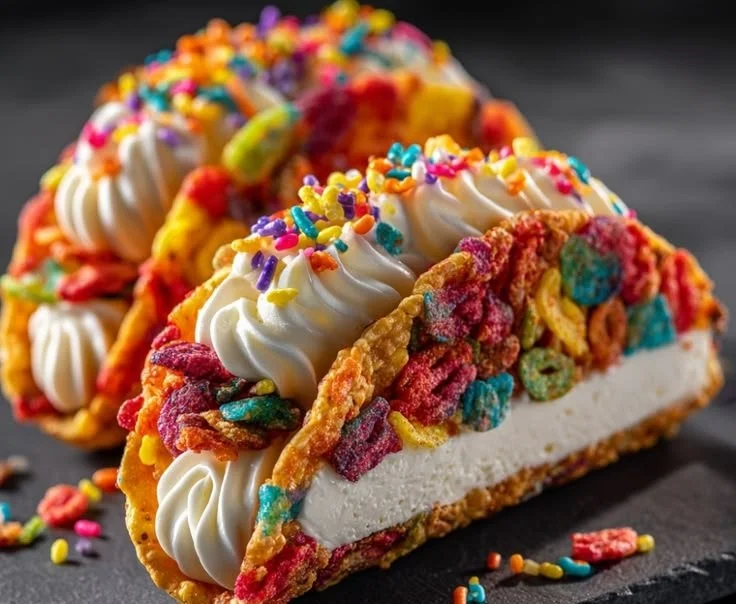
Biting into a Fruity Pebbles Cheesecake Taco is like childhood in a dessert—a joyful explosion of color, flavor, and nostalgia. Growing up, my mornings often revolved around that sugary, rainbow-colored cereal, and the sweet memories from the breakfast table always brought a smile to my face. When I first imagined creating a dessert that mirrored those memories, I knew I had to combine that familiar crunch and flavor into something special.
That’s how these Fruity Pebbles Cheesecake Tacos were born! They’re easy to make, delightful to eat, and perfect for sharing with family and friends. Plus, as a no-bake treat, they take little time to whip up—making them the perfect summer dessert or a fun party dish. So, grab your ingredients, and let’s create a little sweet nostalgia together!
Recipe Timing
- Prep Duration: 30 minutes
- Active Cooking: 15 minutes
- Total Duration: 45 minutes
- Portion Size: Serves 8
- Complexity: Simple
Nutritional Recipe
- Calories per portion: Approximately 240
- Protein: 4g
- Carbs: 29g
- Fats: 12g
- Fiber: 0g
- Sugars: 17g
- Sodium: 150mg
Why You’ll Love This Fruity Pebbles Cheesecake Tacos (The Ultimate No-Bake Treat!)
If you’ve ever wished to capture a rainbow in a dessert, this is your chance! Fruity Pebbles Cheesecake Tacos bring together the creamy and delightful texture of cheesecake with the fun and sweetness of your favorite cereal. Each taco shell is crisp and filled to the brim with a luscious cheesecake filling that’s light, airy, and beautifully sweet. The vibrant colors brighten up any table, making them a hit at gatherings or a whimsical treat on a regular day. You’ll also love how adaptable they are! Get ready to impress your loved ones with these delightful bites of happiness!
The Complete Cooking Journey
Let’s dive into the steps needed to craft these sweet treats. From creating the crispy taco shells to whipping up the blissful cheesecake filling, we have an exciting adventure ahead!
Ingredients:
- 8 Stand ‘N Stuff Taco Shells
- 10 oz White Melting Wafers
- 3 cups Fruity Pebbles Cereal (divided)
- 8 oz Cream Cheese (full-fat, softened)
- 1 cup Powdered Sugar
- 1 cup Heavy Whipping Cream (cold)
- 1 tsp Vanilla Extract
- 1/2 cup Fruity Pebbles Cereal (lightly crushed)
Method:
Step 1: Create the Crispy Taco Shells
Begin by melting the white melting wafers according to the package instructions. Once melted, add 2 cups of Fruity Pebbles cereal and stir until well combined. Using a spoon, carefully shape the mixture into taco shells on a parchment-lined baking tray. Allow them to set at room temperature until firm—this should take about 10-15 minutes.
Step 2: Whip Up the Creamy Cheesecake Filling
In a mixing bowl, combine the softened cream cheese and powdered sugar. Beat them together until smooth and creamy. Then, in another bowl, whip the cold heavy cream with the vanilla extract until soft peaks form. Gently fold the whipped cream into the cream cheese mixture, being careful not to deflate it. Add in the remaining 1 cup of Fruity Pebbles cereal for that perfect crunch!
Step 3: Assemble Your Dessert Tacos
Carefully remove the taco shells from the parchment paper and begin to fill them with the cheesecake mixture. Use a piping bag or a spoon to generously heap the filling into each shell. Sprinkle lightly crushed Fruity Pebbles on top for a decorative touch! Serve immediately for optimal freshness, or chill in the fridge for a bit prior to serving.
Serving Suggestions & Pairings
These Fruity Pebbles Cheesecake Tacos are delightful on their own, but pairing them with a scoop of vanilla ice cream or a drizzle of chocolate sauce can elevate them even further. Consider serving them alongside fresh fruit like strawberries or blueberries for a refreshing contrast.
Storage & Leftovers Guide
To store leftovers, place any uneaten tacos in an airtight container in the refrigerator. Enjoy them within 1-2 days for best results, as the shells may become a bit soft over time due to the filling.
Kitchen Wisdom & Success Tips
- Don’t rush the melting process: Ensure your white melting wafers are completely melted for smooth taco shells.
- Room temperature cream cheese: This helps to create a creamy cheesecake filling with no lumps.
- Chill your tools: Ensure your mixing bowl and beaters for the whipped cream are cold to whip quickly and stay fluffy.
Flavor Variations & Adaptations
While the Fruity Pebbles cereal is a must for that nostalgic flavor, you can switch things up! Consider using Cocoa Pebbles or a similar fruity cereal for a chocolatey twist. You can also swap out vanilla extract for almond extract for a different flavor profile, or add a splash of lemon juice for a zesty kick.
Reader Questions & Solutions
-
Can I make these a day in advance?
Yes, you can prepare the taco shells and cheesecake filling a day ahead. Just assemble them right before serving to keep the shells crisp. -
What if I can’t find Stand ‘N Stuff Taco Shells?
You can create your own taco shells by shaping the melted cereal mixture over a spoon or piece of foil in a taco shape. -
How do I keep the taco shells from getting soggy?
Assemble them close to serving time, and if you’re making them in advance, store the filling and shells separately. -
Can I replace the heavy cream?
Yes! You can use whipped topping for a lighter version or Greek yogurt for a tangy flavor, though the texture will differ. -
What if I don’t have white melting wafers?
You can substitute with chocolate chips or butterscotch chips, just make sure they are melted smoothly!
Wrapping Up
These Fruity Pebbles Cheesecake Tacos are more than just a dessert; they’re a celebration of flavor and texture that brings joy in every bite. So whether you’re looking to impress at a gathering or simply wish to indulge in a nostalgic treat, this recipe is your ticket to delight. Go ahead, give these a try, and savor the sweetness—both in taste and memories! Enjoy your adventures in the kitchen, and happy cooking!
PrintFruity Pebbles Cheesecake Tacos

A delightful no-bake dessert that combines the creamy texture of cheesecake with the fun of Fruity Pebbles cereal, served in taco-shaped shells.
- Prep Time: 30 minutes
- Cook Time: 15 minutes
- Total Time: 45 minutes
- Yield: 8 servings 1x
- Category: Dessert
- Method: No-Bake
- Cuisine: American
- Diet: Vegetarian
Ingredients
- 8 Stand ‘N Stuff Taco Shells
- 10 oz White Melting Wafers
- 3 cups Fruity Pebbles Cereal (divided)
- 8 oz Cream Cheese (full-fat, softened)
- 1 cup Powdered Sugar
- 1 cup Heavy Whipping Cream (cold)
- 1 tsp Vanilla Extract
- 1/2 cup Fruity Pebbles Cereal (lightly crushed)
Instructions
- Create the Crispy Taco Shells: Melt the white melting wafers according to the package instructions. Once melted, add 2 cups of Fruity Pebbles cereal and stir until well combined. Using a spoon, carefully shape the mixture into taco shells on a parchment-lined baking tray. Allow them to set at room temperature until firm—this should take about 10-15 minutes.
- Whip Up the Creamy Cheesecake Filling: In a mixing bowl, combine the softened cream cheese and powdered sugar. Beat them together until smooth and creamy. In another bowl, whip the cold heavy cream with the vanilla extract until soft peaks form. Gently fold the whipped cream into the cream cheese mixture, being careful not to deflate it. Add in the remaining 1 cup of Fruity Pebbles cereal for that perfect crunch!
- Assemble Your Dessert Tacos: Carefully remove the taco shells from the parchment paper and begin to fill them with the cheesecake mixture. Use a piping bag or a spoon to generously heap the filling into each shell. Sprinkle lightly crushed Fruity Pebbles on top for a decorative touch! Serve immediately for optimal freshness, or chill in the fridge before serving.
Notes
Don’t rush the melting process for the taco shells and keep the cream cheese at room temperature for a smooth filling.
Nutrition
- Serving Size: 1 taco
- Calories: 240
- Sugar: 17g
- Sodium: 150mg
- Fat: 12g
- Saturated Fat: 7g
- Unsaturated Fat: 3g
- Trans Fat: 0g
- Carbohydrates: 29g
- Fiber: 0g
- Protein: 4g
- Cholesterol: 30mg