There’s a certain magic in the air during the holiday season, isn’t there? It’s that enchanting blend of cinnamon, pine needles, and, of course, the scent of baking cookies wafting through the house, stirring memories that tug at our hearts. One of my earliest recollections of Christmas vividly includes bustling around my nonna’s kitchen, where she crafted her delicious Traditional Italian Christmas Cookies. The warm, nutty fragrance of almonds and the sweet, citrus notes of zesty oranges filled the air, mesmerizing us as we eagerly awaited those first bites.
This festive season, why not create your own version of these delicate cookies, capturing the essence of Italian holiday traditions right in your kitchen? Let’s embark on this culinary adventure together!
Recipe Timing
- Prep Duration: 30 minutes
- Active Cooking: 45 minutes
- Total Duration: 1 hour 15 minutes
- Portion Size: About 24 cookies
- Complexity: Moderate
Nutritional Recipe
- Calories per portion: Approximately 150
- Protein: 3 g
- Carbs: 18 g
- Fats: 7 g
- Fiber: 1 g
- Sugars: 8 g
- Sodium: 50 mg
Why You’ll Love This Traditional Italian Christmas Cookies
These cookies are not just delightful treats; they hold stories of family traditions and celebrations. The crunchy exterior gives way to a chewy center, all combined with the subtle warmth of spices and the richness of figs and nuts. Perfect for sharing, they also make a beautiful gift when wrapped in festive boxes. Each cookie is a tiny piece of heaven, sparkled with sugar dust that glimmers like holiday lights—a joyful addition to your celebrations.
The Complete Cooking Journey
As we delve deeper into the art of cookie-making, you’ll appreciate how simple ingredients can transform into something truly special. From whipping the egg whites to form fluffy peaks, combining nutty almond flour, and crafting a memorable filling of figs and honey, this journey is as much about the process as it is about the end result. So roll up your sleeves, and let’s create some holiday magic!
Ingredients:
- Almond flour or finely ground blanched almonds
- Egg whites
- Granulated or powdered sugar
- Orange or lemon zest
- Whole or chopped almonds / pine nuts (for topping)
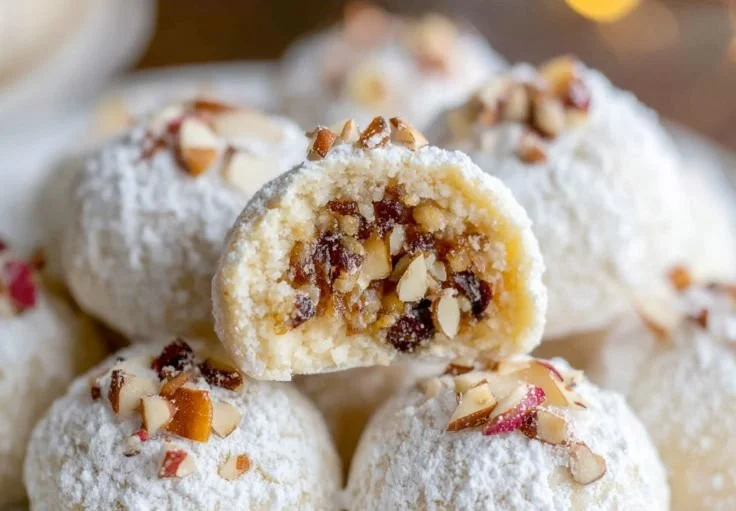
- Dried figs, chopped
- Chopped walnuts or almonds
- Honey or sugar
- Orange or lemon zest
- Optional: cinnamon, cloves, or other warm spices
- Dough:
- flour
- eggs
- butter (or olive oil)
- sugar
- Powdered sugar for dusting
- Chopped nuts or pine nuts for rolling
Method:
Step 1: Whip Egg Whites to Soft Peaks
Start off by whipping the egg whites in a clean bowl until soft peaks form. This will add a beautiful lightness to your cookies.
Step 2: Combine Ingredients for Dough
Gently fold in the almond flour, sugar, and citrus zest until they form a sticky dough. Take your time here, as this step is crucial for texture.
Step 3: Shape and Dust the Cookies
Using your hands, shape the dough into small oval cookies. Dust them lightly with powdered sugar, not just for sweetness, but also for that festive touch.
Step 4: Chill Dough and Bake
Chill the shaped cookies briefly, then bake at 325 °F (160 °C) until they turn lightly golden and are chewy inside—about 15-20 minutes.
Step 5: Prepare Fig-Nut-Honey Filling
While the cookies cool, prepare a intrepid filling with chopped dried figs, walnuts or almonds, honey, and additional citrus zest, plus optional warm spices for a delightful kick.
Step 6: Roll Out Dough for Bracelets
Roll out the dough, cut it into rectangles, spoon the filling onto the center, and fold or roll them into bracelet shapes for a fun twist!
Step 7: Bake the Bracelets
Place your cookie bracelets on a baking sheet and bake until lightly golden—allow to cool completely before the sweet reward!
Step 8: Whip Egg Whites with Sugar for Meringues
Whip another batch of egg whites with sugar to soft peaks, then fold in chopped nuts or almonds.
Step 9: Drop and Bake Meringue Cookies
Drop spoonfuls of this mixture onto a baking sheet, spacing them apart, and bake at 325 °F (160 °C) until they are slightly crisp outside but chewy inside.
Step 10: Mix Almond Paste for Nut Cookies
Mix almond paste with egg whites to create a smooth dough for small almond balls.
Step 11: Shape and Roll in Pine Nuts
Shape into small balls and roll them in pine nuts for a beautiful finish.
Step 12: Bake Almond Balls
Bake these balls at 350 °F (175 °C) until they’re lightly golden on top and soft inside—approximately 15-18 minutes.
Serving Suggestions & Pairings
These cookies are perfect on their own, but if you’re feeling fancy, serve them alongside a scoop of vanilla gelato or a steaming cup of spiced chai. Pair with a glass of sweet dessert wine, and you’ve got a festive treat that’s sure to impress.
Storage & Leftovers Guide
These cookies can be stored in an airtight container for up to a week at room temperature. For longer storage, freeze them! Just layer between parchment paper and keep them in a freezer-safe container. They can last up to three months and can be thawed at room temperature when ready to enjoy.
Kitchen Wisdom & Success Tips
- Ensure your egg whites are at room temperature for best results.
- If you don’t have almond flour, finely ground blanched almonds work wonderfully.
- Don’t rush the baking process; they should be golden and slightly chewy for a perfect texture.
Flavor Variations & Adaptations
Feel free to experiment! Add dried cranberries or apricots in place of figs, or try different nuts according to your taste. A splash of vanilla or a sprinkle of ginger can bring delightful new layers of flavor.
Reader Questions & Solutions
-
What can I use if I don’t have almond flour?
You can grind blanched almonds in a food processor to a fine meal or replace it with a similar nut flour. -
Can I skip the citrus zest?
You can, but it adds a wonderful brightness that complements the sweetness, so it’s recommended! -
How do I make these cookies gluten-free?
Simply substitute regular flour with a gluten-free all-purpose blend. -
What’s the best way to serve these cookies?
They shine on their own, but they’re beautiful with coffee or tea during your holiday gatherings. -
Can I prepare these cookies in advance?
Absolutely! The dough can be made ahead of time, and the cookies can be stored after baking for quick access to festive treats.
Wrapping Up
Baking these Traditional Italian Christmas Cookies is not just about the recipe; it’s about bringing people together and sharing love through food. The satisfaction that comes from enjoying your creations with family and friends is immeasurable. So, tie on your apron, summon that holiday spirit, and let’s create something delicious that will be cherished for years to come. Buon Appetito!