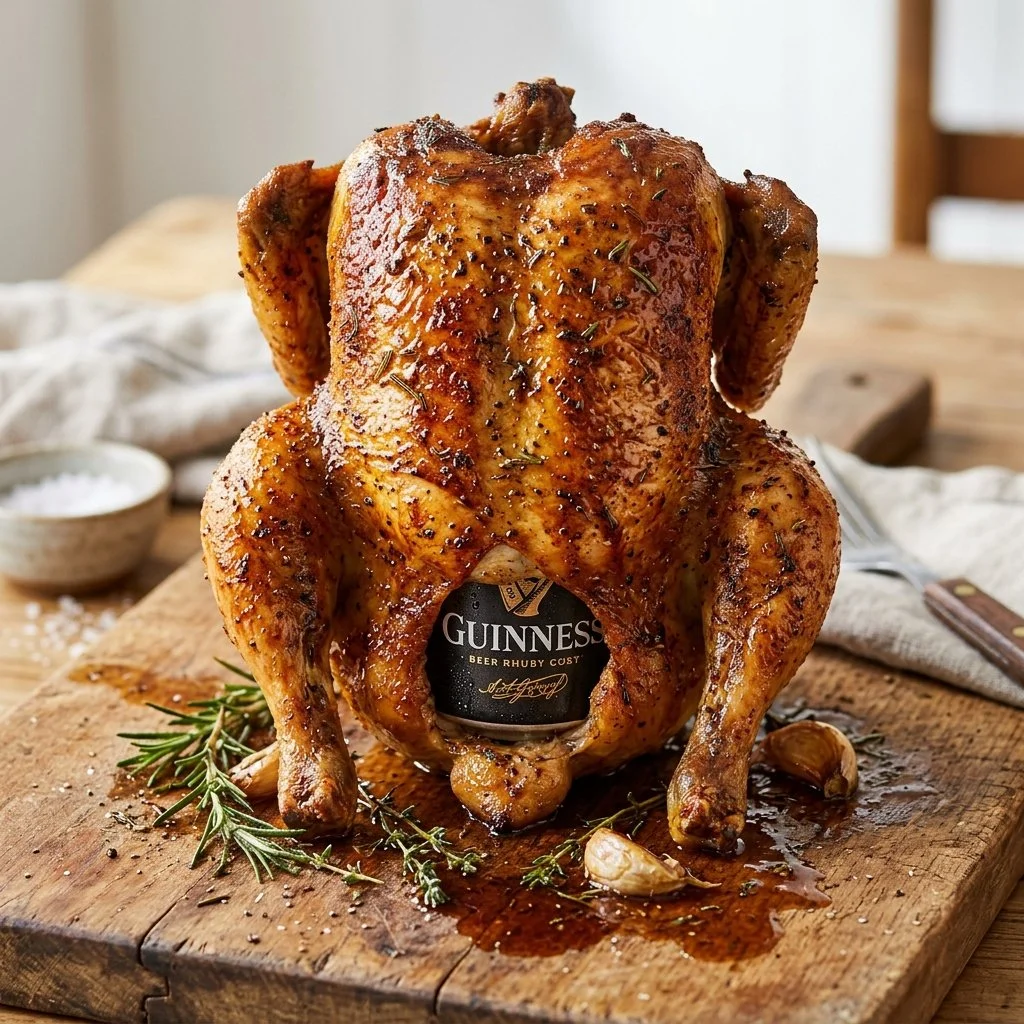
There’s something mesmerizing about placing a whole chicken on the grill, especially when it’s perched precariously on a can of beer. It brings back memories of summer evenings spent outdoors, laughter ringing in the air, and that unmistakable smoky aroma wafting through the neighborhood. The first time I tried Beer Can Chicken was at a backyard barbecue hosted by a friend, and I can still recall the juicy, tender meat that fell off the bone with just a gentle tug. The excitement of everyone gathering around the grill, waiting for that golden bird to emerge, is something I simply had to recreate in my own kitchen.
Recipe Timing
- Prep Duration: 15 minutes
- Active Cooking: 1 hour 30 minutes
- Total Duration: 1 hour 45 minutes
- Portion Size: Serves 4-6
- Complexity: Simple
Nutritional Recipe
- Calories per portion: Approximately 350
- Protein: 48 grams
- Carbs: 5 grams
- Fats: 16 grams
- Fiber: 0 grams
- Sugars: 0 grams
- Sodium: 950 mg
Why You’ll Love This Beer Can Chicken
Beer Can Chicken is a delightful fusion of flavors and textures. The chicken cooks evenly, thanks to the steam from the beer, which keeps it moist and tender throughout. The seasoning crust forms a beautifully flavorful skin that you just can’t resist. Plus, the presentation of a plump bird sitting on a can adds an element of fun and camaraderie to any gathering. It’s a dish that commands attention and invites conversation, making it perfect for weekends with friends or casual family dinners.
The Complete Cooking Journey
Get ready to embark on a culinary adventure that transforms a humble chicken into a showstopper. This recipe effortlessly elevates your meal into a celebration of flavor and texture, making your taste buds dance with joy. As the chicken roasts, the aromas that drift from your grill will have everyone eagerly awaiting their first bite. Let’s dive into the steps that will lead you to barbecue bliss!
Ingredients:
- 1 whole chicken
- 1 can of beer (your favorite variety)
- 2 tablespoons olive oil
- 1 tablespoon garlic powder
- 1 tablespoon onion powder
- 1 tablespoon smoked paprika
- 1 tablespoon salt
- 1 tablespoon black pepper
- 1 teaspoon cayenne pepper (optional)
- Fresh herbs (optional for garnish)
Method:
Step 1: Preheat Your Grill
Preheat your grill to a medium heat, around 350°F (175°C). This creates the perfect environment for the chicken to cook evenly and develop that flavorful, crispy skin.
Step 2: Prepare the Chicken
Rinse the chicken under cold water and pat it dry with paper towels. Ensuring it’s dry helps the skin crisp up beautifully during grilling.
Step 3: Season the Chicken
Rub the entire chicken with olive oil, covering it from head to toe. Generously season it with garlic powder, onion powder, smoked paprika, salt, black pepper, and if you’re feeling adventurous, that kick of cayenne pepper for some added heat.
Step 4: Open the Beer
Pop open the can of beer and take a few sips (or pour some out if you prefer). You want to leave enough space for the delicious steam to build up inside the can as the chicken cooks.
Step 5: Insert the Beer Can
Carefully insert the can of beer into the cavity of the chicken, ensuring it stands upright. This is where the magic happens; the beer keeps the chicken moist while allowing it to cook evenly.
Step 6: Place the Chicken on the Grill
Position the chicken on the grill, making sure it’s stable. You may want to use a grilling pan or a specially designed beer can chicken holder for added stability.
Step 7: Close the Grill Lid
With the lid closed, let the chicken cook for about 1 to 1.5 hours. The cooking time may vary depending on the size of your chicken, so keep an eye on it and use a meat thermometer to check for doneness.
Step 8: Rest the Chicken
Once the internal temperature reaches 165°F (75°C), carefully remove the chicken from the grill. Let it rest for about 10 minutes; this step allows the juices to redistribute, resulting in tender, succulent meat.
Step 9: Serve the Chicken
Garnish with fresh herbs if you desire, then serve your majestic creation to eager guests. Watch their faces light up as they dig into this beer-infused masterpiece!
Serving Suggestions & Pairings
Beer Can Chicken is delicious on its own, but pairing it with classic sides can elevate your meal. Try serving it alongside a refreshing coleslaw, grilled corn on the cob, or roasted potatoes. A chilled lager or a zesty lemonade can balance the smoky flavors perfectly.
Storage & Leftovers Guide
If you have any leftovers (which might be a rare occurrence), you can store them in an airtight container in the refrigerator for up to 3 days. Reheat the chicken in the oven to maintain its juiciness and crispness when warming it up.
Kitchen Wisdom & Success Tips
- Don’t rush the prep! Letting the chicken sit with the seasoning for a little while can intensify the flavors.
- If you’re using a charcoal grill, create a two-zone fire for indirect cooking. This means having your coals on one side and the chicken on the other.
- Keep a close eye on your grill temperature for optimum cooking results.
Flavor Variations & Adaptations
Feeling adventurous? Try experimenting with different types of beer! A citrusy IPA can provide a unique tang, or a spiced winter ale can add warmth during cooler months. You could also swap out spices based on your preferences; cumin and chili powder can give a completely different flavor profile.
Reader Questions & Solutions
- Can I use a different kind of alcohol? Yes! You can use soda, cider, or even flavored seltzer if you want a unique twist.
- What if I don’t have a grill? No problem! You can also bake the chicken in a conventional oven at the same temperature.
- How can I tell when the chicken is done? Use a meat thermometer inserted into the thickest part of the breast to ensure it reaches at least 165°F (75°C).
- Can I make this ahead of time? While it’s best enjoyed fresh, you can prep the chicken and season it a day in advance; just keep it refrigerated.
- What should I do if the skin isn’t crispy? If you find the skin is still soft, you can finish it under a broiler for a few minutes after grilling to achieve that extra crisp.
Wrapping Up
Beer Can Chicken is not just a meal; it’s an experience. With every bite, you’ll capture the essence of summer, good times, and unforgettable flavors. So gather your friends, fire up the grill, and enjoy this festive dish that’s sure to bring smiles all around. Happy grilling!
PrintBeer Can Chicken

A smoky, moist whole chicken grilled upright on a can of beer, perfect for summer gatherings.
- Prep Time: 15 minutes
- Cook Time: 90 minutes
- Total Time: 105 minutes
- Yield: 4-6 servings 1x
- Category: Main Course
- Method: Grilling
- Cuisine: American
- Diet: Paleo
Ingredients
- 1 whole chicken
- 1 can of beer (your favorite variety)
- 2 tablespoons olive oil
- 1 tablespoon garlic powder
- 1 tablespoon onion powder
- 1 tablespoon smoked paprika
- 1 tablespoon salt
- 1 tablespoon black pepper
- 1 teaspoon cayenne pepper (optional)
- Fresh herbs (optional for garnish)
Instructions
- Preheat your grill to a medium heat, around 350°F (175°C).
- Rinse the chicken under cold water and pat it dry with paper towels.
- Rub the entire chicken with olive oil, then generously season with garlic powder, onion powder, smoked paprika, salt, black pepper, and cayenne pepper if desired.
- Pop open the can of beer and take a few sips, leaving space for steam.
- Insert the can of beer into the cavity of the chicken, ensuring it stands upright.
- Position the chicken on the grill, making sure it’s stable.
- Close the grill lid and let the chicken cook for about 1 to 1.5 hours.
- Remove the chicken from the grill once it reaches an internal temperature of 165°F (75°C).
- Let it rest for about 10 minutes before serving.
- Garnish with fresh herbs and enjoy!
Notes
Letting the chicken sit with the seasoning will intensify flavors. Use a meat thermometer to ensure doneness.
Nutrition
- Serving Size: 1 serving
- Calories: 350
- Sugar: 0g
- Sodium: 950mg
- Fat: 16g
- Saturated Fat: 4g
- Unsaturated Fat: 12g
- Trans Fat: 0g
- Carbohydrates: 5g
- Fiber: 0g
- Protein: 48g
- Cholesterol: 85mg