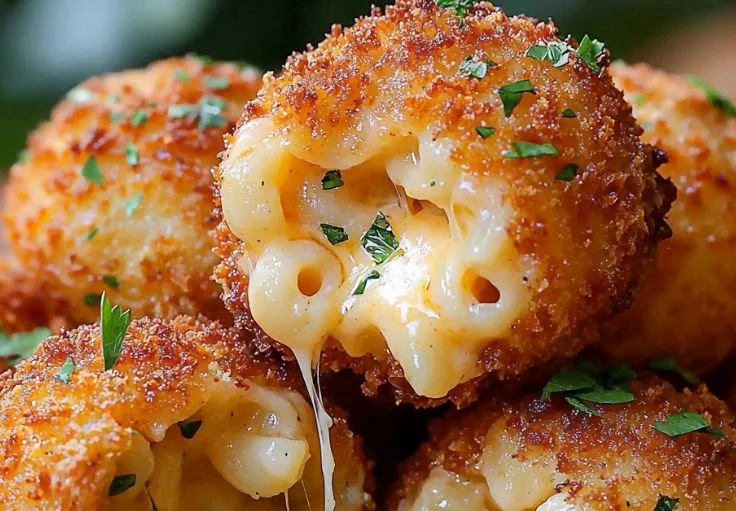
As the sun began to set on a chilly autumn evening, the aroma of melted cheese and fried goodness filled my kitchen. I was ready to recreate a beloved comfort food that always makes my heart skip a beat: Crispy Fried Mac and Cheese Balls. These bite-sized delights are not just a treat for the taste buds; they’re a nostalgic nibble that transports me back to carefree childhood days filled with laughter and shared meals. Whether you’re looking for an irresistible party appetizer or a cozy indulgence for movie night, these cheesy morsels are sure to be a hit!
Recipe Timing
- Prep Duration: 15 minutes (not including refrigeration time)
- Active Cooking: 15 minutes
- Total Duration: 2 hours 30 minutes (including chilling time)
- Portion Size: 24 balls (approximately)
- Complexity: Simple
Nutritional Recipe
- Calories per portion: 150
- Protein: 5 grams
- Carbs: 12 grams
- Fats: 10 grams
- Fiber: 1 gram
- Sugars: 2 grams
- Sodium: 300 mg
Why You’ll Love This Crispy Fried Mac and Cheese Balls
Imagine a warm, crunchy exterior giving way to a gooey, cheesy center that stretches as you take a bite. It’s the perfect balance of textures and flavors that turns a simple comfort food into an extraordinary snack. Not only do these mac and cheese balls satisfy your cravings, but they also allow you to transform leftover macaroni into a culinary masterpiece. Plus, if you’re like me, the excitement of frying brings a delightful thrill to the kitchen!
The Complete Cooking Journey
We’re about to embark on a delicious adventure to create these crispy fried wonders. Follow along as we transform ordinary mac and cheese into crispy balls of joy that I promise will have you coming back for seconds (or thirds!).
Ingredients:
- 4 cups prepared mac and cheese, chilled: Either homemade or really good leftover mac and cheese that’s thick and cheesy
- 1 cup sharp cheddar cheese, shredded: The combination gives you that perfect cheese flavor that stands up to frying
- 1/2 cup Parmesan cheese, grated: Adds depth and richness to the cheese blend
- 1 cup all-purpose flour: For the first coating layer
- 3 large eggs, beaten: Essential for the triple coating system
- 2 cups seasoned breadcrumbs: Creates maximum crispiness on the outside
- Vegetable oil for frying: You need it hot enough to get them golden without making them greasy
- Salt and pepper to taste: Season the mac and cheese base if needed
Method:
Step 1: Create Your Cheese Sauce
If making fresh, melt 4 tablespoons butter in a saucepan. Whisk in 4 tablespoons flour, cooking for a couple of minutes until it turns golden. Gradually add 2 cups milk while whisking constantly until thickened. Finally, stir in both the cheddar and Parmesan cheeses until you achieve a smooth, creamy sauce.
Step 2: Mix with Macaroni
Combine this rich cheese sauce with 3 cups of cooked macaroni, ensuring every piece is well coated in that delicious cheesy goodness.
Step 3: Chill for Perfection
Transfer the mac and cheese mixture to a baking dish and refrigerate for at least 2 hours (overnight is even better). This chilling time is crucial; it helps the mixture firm up so you can roll it into balls without them falling apart.
Step 4: Shape the Balls
Once the mac and cheese has fully chilled and become firm, scoop out portions and roll them into balls about the size of ping pong balls. Make sure they’re uniform so that they cook evenly.
Step 5: Prepare the Coating Stations
Set up three bowls: one with flour, another with beaten eggs, and the third filled with seasoned breadcrumbs. This assembly line will streamline the coating process.
Step 6: Coat the Balls
Roll each mac and cheese ball in flour first, ensuring even coverage. Next, dip it into the beaten eggs, and finally, coat thoroughly with breadcrumbs for that perfect crispy shell.
Step 7: Heat the Oil
Heat your vegetable oil to exactly 350 degrees F. Use a thermometer here; getting the temperature right is key to achieving that perfect golden color without greasiness.
Step 8: Fry the Balls
Fry the balls in small batches for 2 to 3 minutes until golden brown all over. Avoid overcrowding the pan; this helps maintain the oil’s temperature.
Step 9: Drain and Serve
Remove them with a slotted spoon and drain on paper towels for just a minute before serving. For the best experience, enjoy these delightful bites while they’re still hot, allowing that molten cheese to extend with every delicious bite!
Serving Suggestions & Pairings
These crispy fried mac and cheese balls make a fabulous appetizer for parties or game day snacks. Pair them with a zesty marinara or a creamy ranch dip for an extra flavor boost. They also go well with a crisp side salad or some tangy coleslaw to balance out the richness.
Storage & Leftovers Guide
If you have leftovers (which is rare!), store them in an airtight container in the fridge for up to 3 days. To reheat, pop them in the oven at 375°F for about 10 minutes to restore their crispy texture, or re-fry them lightly for an extra crunchy finish.
Kitchen Wisdom & Success Tips
- Ensure that your mac and cheese is chilled thoroughly before forming the balls; this is crucial for maintaining their shape during frying.
- Use a thermometer to monitor the oil’s temperature accurately. If the oil is too hot, the outside will burn before the inside warms—you want a golden perfection.
- Fry in small batches to avoid lowering the oil temperature.
Flavor Variations & Adaptations
Feeling adventurous? Try adding cooked bacon bits or chopped green onions to the mac and cheese mix for a gourmet twist. You could even use different kinds of cheese, like pepper jack for a spicy kick, or incorporate herbs for added depth.
Reader Questions & Solutions
-
What if my mac and cheese is too runny?
- If your mac and cheese is too thin, cook it down on low heat until some of the moisture evaporates, or add a touch of additional cheese to thicken it up.
-
Can I bake these instead of frying?
- While frying gives the best crispy results, you can bake them! Preheat your oven to 400°F and place them on a parchment-lined tray, baking for about 20 minutes, flipping halfway through.
-
How do I keep them warm for a party?
- Keep them warm in a 200°F oven while the rest of your batches are frying to make sure they stay toasty.
-
Can I freeze these?
- Yes! You can freeze the coated balls before frying. Just layer them in a single layer on a baking sheet, freeze until solid, then transfer to an airtight container. When ready to eat, fry them straight from frozen, adding a couple of extra minutes to the cooking time.
-
What should I do if they start to fall apart?
- They might need more chilling time. Also, ensure your oil is hot enough before frying; if it’s too cool, they will absorb oil and fall apart.
Wrapping Up
Crispy Fried Mac and Cheese Balls are more than just food; they encapsulate moments of joy, laughter, and shared experiences. I encourage you to gather your friends and family, unleash your inner chef, and recreate this beloved dish that brings smiles to faces with every cheesy, crunchy bite. Happy cooking!