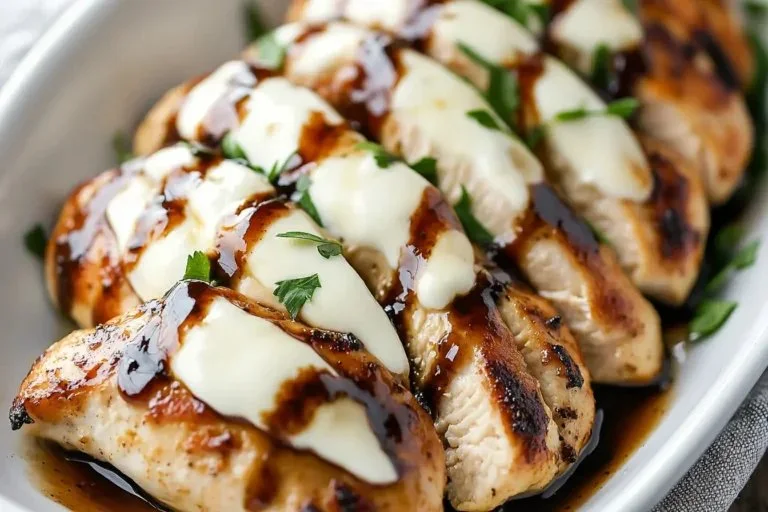
There’s something magical about a well-cooked chicken dish that can change the whole atmosphere of a dinner table. I remember the first time I stumbled upon a “Marry Me Chicken” recipe; it was as if the heavens had opened up, and angels were singing about those creamy, savory bites that promised to woo your taste buds. The original version, rich with cream and cheese, felt a little daunting for my dairy-free friends, but I knew I had to transform that nostalgic recipe into something equally enchanting yet inclusive. Enter: Dairy-Free Marry Me Chicken: Pressure Cooker Style! This dish brings together tender chicken, aromatic garlic, and a luxurious coconut milk sauce that will make everyone feel loved at first bite.
Recipe Timing
- Prep Duration: 10 minutes
- Active Cooking: 20 minutes
- Total Duration: 30 minutes
- Portion Size: 4 servings
- Complexity: Simple
Nutritional Recipe
- Calories per portion: Approximately 370
- Protein: 30 grams
- Carbs: 10 grams
- Fats: 24 grams
- Fiber: 3 grams
- Sugars: 2 grams
- Sodium: 450 mg
Why You’ll Love This Dairy-Free Marry Me Chicken: Pressure Cooker Style
This delectable dish not only boasts a creamy sauce that’s completely dairy-free but also cuts down on cooking time thanks to the pressure cooker! Imagine your chicken soaking in the rich flavors of coconut milk, infused with aromatic garlic and zesty sun-dried tomatoes. Each bite is an explosion of flavor that comforts the soul and stirs warm conversations around the table. It’s perfect for date nights, family dinners, or impressing friends with minimal effort—all while being inclusive for those who are lactose-intolerant or following a dairy-free lifestyle.
The Complete Cooking Journey
From prepping your ingredients to the delightful aroma wafting through your kitchen, this dish takes you on a culinary adventure. It begins with a quick slice of garlic and a meaningful seasoning of chicken. As it cooks, anticipation grows, and soon your pressure cooker will transform simple ingredients into a rich, creamy oasis that will have everyone sweetly gasping, “I do!”
Ingredients:
- 1 ½ pounds chicken breasts (seasoned with salt and pepper)
- 2 tablespoons avocado oil (for browning)
- 3 cloves garlic (minced)
- 1 can (13.5-ounce) full-fat coconut milk
- ½ cup chicken broth (for broth depth and thickening)
- 1 teaspoon dried oregano
- ½ teaspoon crushed red pepper flakes (optional for heat)
- ¾ cup sun-dried tomatoes (roughly chopped)
- 3 tablespoons nutritional yeast (to deepen taste without dairy)
- To taste salt and pepper (to season)
- 1 tablespoon arrowroot starch (mixed with a few tablespoons of chicken broth for thickening)
- ½ cup fresh basil (julienned plus more for garnish)
Method:
Step 1: Season the Chicken
Begin by seasoning your chicken breasts generously with salt and pepper. The chicken is the star of the show, so make sure it’s well-prepped for flavor!
Step 2: Brown the Chicken
Set your pressure cooker to the sauté mode and add the avocado oil. Once heated, add the chicken breasts and brown them evenly on both sides for about 3-4 minutes. It will develop a lovely golden crust!
Step 3: Sauté the Aromatics
After browning, add the minced garlic to the pot and sauté for about 1 minute until fragrant. This step fills your kitchen with an irresistible aroma that sets the stage for deliciousness.
Step 4: Add the Coconut Milk and Broth
Pour in the full-fat coconut milk and chicken broth. Stir to combine the flavors, scraping up any bits stuck to the bottom of the pot for an extra layer of flavor.
Step 5: Season and Flavor It Up
Sprinkle in the dried oregano, optional crushed red pepper flakes for a hint of heat, and sun-dried tomatoes. Add the nutritional yeast for that creamy, cheesy depth without dairy—trust me, it’s a game changer!
Step 6: Pressure Cook the Chicken
Seal the lid of your pressure cooker and set it to cook on high pressure for 10 minutes. Once done, allow for a natural release for 5 minutes, then quick release the remaining pressure.
Step 7: Thicken the Sauce
In a small bowl, mix the arrowroot starch with a few tablespoons of chicken broth. After the pressure has released, stir this mixture into the pot to thicken your luscious sauce.
Step 8: Garnish and Serve
Finally, fold in the fresh basil just before serving. The vibrant green color and aroma will elevate this dish to a whole new level. Serve it up, and watch your loved ones swoon!
Serving Suggestions & Pairings
This Dairy-Free Marry Me Chicken pairs beautifully with fluffy jasmine rice or a hearty quinoa salad. If you’re feeling green, toss together a crisp side salad with a lemon vinaigrette for a bright contrast. And don’t forget a chilled glass of your favorite white wine, which complements the dish perfectly!
Storage & Leftovers Guide
Store any leftovers in an airtight container in the fridge for up to 3 days. The flavors will deepen as they sit! Reheat gently on the stove or in the microwave. You can also freeze the chicken in portions for up to 2 months—just let it thaw overnight in the fridge when you’re ready to enjoy it again.
Kitchen Wisdom & Success Tips
- Use fresh ingredients whenever possible. Fresh basil and quality coconut milk can elevate your dish.
- Pace yourself—season the chicken well, and don’t skimp on the garlic!
- If you’re not a fan of sun-dried tomatoes, feel free to swap in chopped mushrooms or bell peppers for a different twist.
Flavor Variations & Adaptations
Feel free to switch up the herbs! Thyme or parsley can add a different flavor profile. For an extra kick, add more red pepper flakes or a splash of your favorite hot sauce. And if you’re looking for more protein, toss in some chickpeas for added texture and nutrients.
Reader Questions & Solutions
-
Can I use frozen chicken?
- Yes, absolutely! Just be sure to increase the cooking time by 5-7 minutes.
-
What if I don’t have coconut milk?
- You can use any non-dairy milk, but the result may be less creamy. Alternatively, add a vegan cream cheese for richness.
-
Can I prepare this in advance?
- Yes, you can marinate the chicken in the seasonings the night before, making the cooking process super quick!
-
Is there a vegetarian option?
- You can substitute chicken with firm tofu or jackfruit, adjusting cooking times accordingly.
-
How do I fix a runny sauce?
- If the sauce is too thin, add a splash more arrowroot starch mixed with broth and simmer for a few minutes.
Wrapping Up
Cooking doesn’t have to be complicated. With this Dairy-Free Marry Me Chicken: Pressure Cooker Style, you can dish up something that’s not just soothing to the palate but also easy on the preparation. This recipe is a warm invitation, calling you to create delightful meals that nurture both body and soul. So roll up your sleeves, grab your pressure cooker, and dive into an adventure you’ll be bragging about long after the plates are cleared. Enjoy the love blended into every bite!
PrintDairy-Free Marry Me Chicken: Pressure Cooker Style
A delightful dairy-free chicken dish cooked in a pressure cooker, featuring a creamy coconut milk sauce infused with garlic and sun-dried tomatoes.
- Prep Time: 10 minutes
- Cook Time: 20 minutes
- Total Time: 30 minutes
- Yield: 4 servings 1x
- Category: Main Course
- Method: Pressure Cooking
- Cuisine: American
- Diet: Dairy-Free
Ingredients
- 1 ½ pounds chicken breasts (seasoned with salt and pepper)
- 2 tablespoons avocado oil (for browning)
- 3 cloves garlic (minced)
- 1 can (13.5-ounce) full-fat coconut milk
- ½ cup chicken broth (for broth depth and thickening)
- 1 teaspoon dried oregano
- ½ teaspoon crushed red pepper flakes (optional for heat)
- ¾ cup sun-dried tomatoes (roughly chopped)
- 3 tablespoons nutritional yeast (to deepen taste without dairy)
- To taste salt and pepper (to season)
- 1 tablespoon arrowroot starch (mixed with a few tablespoons of chicken broth for thickening)
- ½ cup fresh basil (julienned plus more for garnish)
Instructions
- Season the chicken breasts generously with salt and pepper.
- Brown the chicken in a heated pressure cooker with avocado oil for about 3-4 minutes on each side.
- Sauté the minced garlic in the pot for about 1 minute until fragrant.
- Add the coconut milk and chicken broth, stirring to combine.
- Sprinkle in oregano, crushed red pepper flakes, and sun-dried tomatoes, then add nutritional yeast.
- Seal the pressure cooker and cook on high pressure for 10 minutes.
- Allow for a natural release for 5 minutes, then quick release the remaining pressure.
- Thicken the sauce by stirring in the arrowroot starch mixture.
- Garnish with fresh basil just before serving.
Notes
For added protein, chickpeas can be tossed into the mix. Use fresh ingredients for the best flavor.
Nutrition
- Serving Size: 1 serving
- Calories: 370
- Sugar: 2g
- Sodium: 450mg
- Fat: 24g
- Saturated Fat: 10g
- Unsaturated Fat: 14g
- Trans Fat: 0g
- Carbohydrates: 10g
- Fiber: 3g
- Protein: 30g
- Cholesterol: 80mg