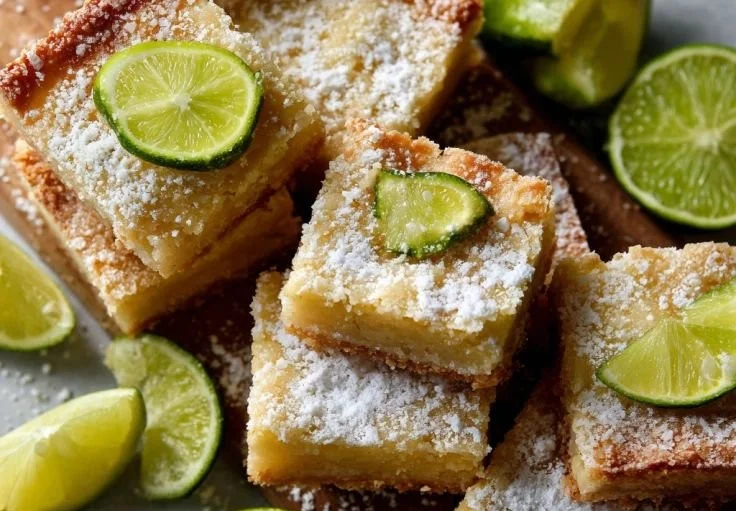
Is there anything more quintessentially refreshing than the zing of lime on a hot summer day? I can still remember the first time I tasted a perfect margarita at a quaint little beachside bar. It was the kind of drink that made me feel like I was on vacation—sunshine streaming down, beach waves lapping at my feet, and that cool glass in my hand. Inspired by that moment, I knew I had to create something that captured those flavors in a fun, shareable dessert. Enter my Margarita Bars—a delightful twist on a classic that encapsulates all the refreshing zest of my favorite drink.
Imagine sinking your teeth into a luscious, tangy filling resting upon a buttery crust, with that perfect dusting of powdered sugar on top. It’s a little slice of paradise that transports you straight to a sunny terrace, surrounded by laughter and good company.
Recipe Timing
- Prep Duration: 15 minutes
- Active Cooking: 30 minutes
- Total Duration: 45 minutes, plus cooling time
- Portion Size: 12 bars
- Complexity: Simple
Nutritional Recipe
- Calories per portion: 210
- Protein: 3g
- Carbs: 30g
- Fats: 10g
- Fiber: 0g
- Sugars: 19g
- Sodium: 45mg
Why You’ll Love This Margarita Bars
These Margarita Bars are the perfect treat for any gathering—be it a summer BBQ, a lively pool party, or simply a well-deserved cap to your dinner with friends. The balance of sweet and tart, combined with a melt-in-your-mouth crust, creates an unforgettable experience. Plus, they’re incredibly easy to make! Your friends will think you’re a culinary genius, and in just 45 minutes, you can prove them right!
The Complete Cooking Journey
Cooking these Margarita Bars is like a mini vacation. You start with mixing a sweet-salty crust that bakes to perfection while you whip up a zesty lime filling. The aroma of fresh lime wafts through your kitchen, tantalizing your senses and giving you that sunny beach feel, even if you’re just at home.
Ingredients:
- 1 1/2 cups all-purpose flour
- 1/2 cup powdered sugar
- 1/2 cup unsalted butter (softened)
- Pinch of salt
- 3 large eggs
- 1 1/2 cups granulated sugar
- 2 tablespoons all-purpose flour
- Zest of 2 limes
- 1/2 cup fresh lime juice (about 4-5 limes)
- 1 tablespoon tequila (optional)
- 1/2 teaspoon vanilla extract
- Extra powdered sugar (for dusting)
- Lime slices or zest (for garnish)
- Coarse sugar or salt (for optional rim)
Method:
Step 1: Preheat the Oven
First things first, preheat your oven to 350°F (175°C). A warm oven is the secret to a perfectly baked crust!
Step 2: Make the Crust Mixture
In a bowl, combine 1 1/2 cups of flour, 1/2 cup of powdered sugar, softened butter, and a pinch of salt. Mix until you have a crumbly dough that feels like wet sand between your fingers.
Step 3: Press the Dough into the Pan
Take your crumbly dough and press it firmly into the bottom of a greased 9×13-inch baking pan. It’s important to pack it in well so the base holds together nicely once baked.
Step 4: Bake the Crust
Place the crust in the preheated oven and bake for 12-15 minutes, until it’s set and lightly golden. The smell will be downright tempting!
Step 5: Whisk the Egg Mixture
While the crust is baking, whisk together 3 large eggs and 1 1/2 cups of granulated sugar until smooth. This is where the magic starts—you’ll see it transform into a silky mixture.
Step 6: Stir in the Remaining Ingredients
Next, stir in the 2 tablespoons of flour, then add the fresh lime zest, lime juice, tequila (if you’re using it), and the 1/2 teaspoon of vanilla extract. Whisk it together until everything is beautifully combined; you want to capture all that zesty goodness.
Step 7: Pour the Filling over the Crust
Once your crust is ready, pull it out of the oven and pour that luscious filling over the baked crust, smoothing it out gently.
Step 8: Bake the Bars
Return the pan to the oven and bake for an additional 15-20 minutes. The filling should just be set and slightly wobbly in the center—don’t overbake or it becomes too firm!
Step 9: Cool the Bars
Allow the bars to cool completely on a wire rack. Patience is key here; letting them cool properly will make cutting and serving a breeze.
Step 10: Dust and Garnish
Once cooled, dust the top generously with powdered sugar and add lime slices or zest for a vibrant touch. For that extra fun margarita presentation, sprinkle coarse sugar or salt around the edges of each bar.
Serving Suggestions & Pairings
These Margarita Bars shine on their own, but pair them with a scoop of vanilla ice cream or a dollop of whipped cream for an upscale twist. Serve with a refreshing iced tea or a fizzy lime soda for an extra zing to your summer picnic.
Storage & Leftovers Guide
You can keep any leftover Margarita Bars in an airtight container in the fridge for up to 4 days. They can also be kept in the freezer for a month if you’re looking to save some sweetness for later.
Kitchen Wisdom & Success Tips
- Use fresh limes for the best flavor—bottled juice just doesn’t compare!
- If you want a stronger flavor punch in your bars, increase the lime zest slightly.
- For a gluten-free version, swap the all-purpose flour with a gluten-free blend.
Flavor Variations & Adaptations
Feeling adventurous? Try adding a splash of orange juice for a hint of citrus sweetness. You can also mix in a handful of coconut for a tropical flair or swap the lime for lemon if you desire a different tartness.
Reader Questions & Solutions
-
Can I make these bars ahead of time?
Absolutely! These bars are perfect for making the day before and just storing them in the fridge. -
What if I don’t have fresh lime juice?
In a pinch, bottled juice can work, but fresh limes elevate the flavor significantly. -
How do I know if the bars are done?
The filling should be set but still have a slight wobble. A toothpick inserted should come out clean but with some moisture. -
Can I substitute the tequila?
Yes, feel free to leave it out or replace it with non-alcoholic alternatives such as flavored sparkling water. -
What’s the best way to cut these bars?
Use a sharp knife dipped in warm water to get clean cuts without sticking.
Wrapping Up
So there you have it—Margarita Bars that bring summer vibes into your kitchen, no matter the season. With each bite, you’ll be transported to sunny days spent sipping margaritas, laughing, and making beautiful memories. So grab your limes and let’s whip up something delicious! Happy baking!