There’s something incredibly nostalgic about a strawberry cheesecake dessert, isn’t there? I remember my first bite of a creamy cheesecake, perfectly balanced with that sweet-tart burst of fresh strawberries on top. My grandmother was the master of this dessert, always whipping up her no-bake version during summer gatherings. It was a classic, and every slice felt like a warm hug – rich, satisfying, and undeniably delicious. Today, I’m thrilled to share a recipe that captures that same love and joy but takes it a step further with these delightful No-Bake Strawberry Cheesecake Bars. Perfect for warm evenings or casual gatherings with friends, these bars are so easy to make that you’ll find yourself making them time and time again!
Recipe Timing
- Prep Duration: 30 minutes
- Active Cooking: 20 minutes
- Total Duration: 3 to 4 hours (including chilling time)
- Portion Size: Serves 9
- Complexity: Simple
Nutritional Recipe
- Calories per portion: Approximately 350
- Protein: 5g
- Carbs: 32g
- Fats: 23g
- Fiber: 1g
- Sugars: 19g
- Sodium: 210mg
Why You’ll Love This No-Bake Strawberry Cheesecake Bars
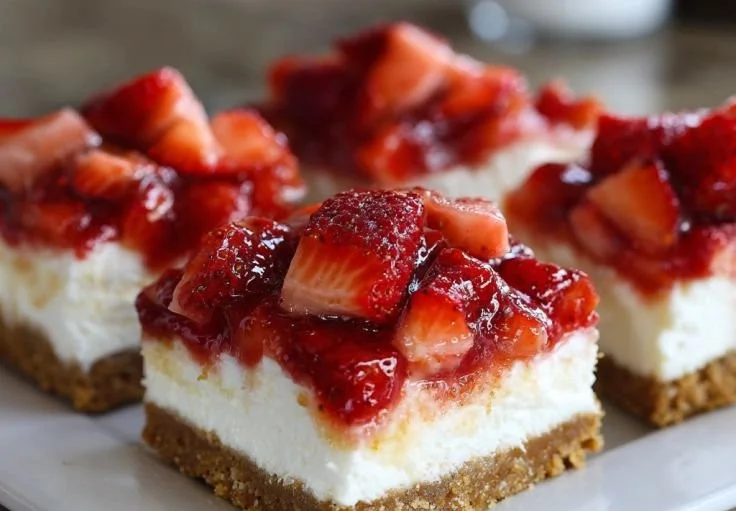
These bars are not only incredibly simple to whip up; they’re also a crowd-pleaser! The sweet and creamy cheesecake filling is layered on a buttery graham cracker crust, topped with fresh strawberries that sing with vibrant flavor. No baking means less fuss and more time to spend enjoying your delicious creation. They’re perfect for potlucks, romantic dinners, or simply satisfying a sweet craving! And since they can be made in advance, they fit seamlessly into your busy lifestyle.
The Complete Cooking Journey
To create these No-Bake Strawberry Cheesecake Bars, we’ll start with a crunchy graham cracker crust that sets the delicious groundwork. We’ll then make a smooth and creamy cheesecake filling that’s lightened up with whipped topping. Lastly, we’ll add a beautiful layer of fresh strawberries tossed with just a touch of sugar to bring out their natural sweetness. The end result? A dessert that’s not just a treat for the taste buds but a visual delight too!
Ingredients:
- 1¾ cups graham cracker crumbs
- ¼ cup sugar
- 6 tbsp melted butter
- 16 oz cream cheese (softened)
- ⅔ cup sugar
- 1 tsp vanilla extract
- 1 cup whipped topping or whipped cream
- 2 cups fresh strawberries (sliced)
- 2 – 3 tbsp sugar
- 1 – 2 tsp lemon juice (optional)
Method:
Step 1: Prepare the Crust Mixture
Combine the graham cracker crumbs, ¼ cup sugar, and 6 tbsp melted butter in a bowl until the mixture is uniform. The aroma of the buttery crumbs will transport you to summer barbecues!
Step 2: Form the Crust Base
Press the crust mixture firmly into the bottom of a 9×9-inch pan and chill in the fridge. This step ensures a solid foundation for your luscious cheesecake filling.
Step 3: Make the Cheesecake Filling
In a large mixing bowl, beat the softened cream cheese with ⅔ cup sugar and 1 tsp vanilla extract until smooth and creamy. The mixture should be light and fluffy, perfect for spreading.
Step 4: Fold in the Whipped Topping
Gently fold in 1 cup of whipped topping until well combined. This lightens the filling and provides that dreamy texture we all love.
Step 5: Spread the Cheesecake Filling
Evenly spread the cheesecake filling over the chilled crust, smoothing the surface to create a beautiful canvas for your strawberries.
Step 6: Prepare the Strawberries
In a separate bowl, toss the sliced strawberries with 2 – 3 tbsp sugar and 1 – 2 tsp of optional lemon juice. Allow them to rest for a few minutes to macerate, enhancing their flavor and sweetness.
Step 7: Top the Cheesecake Layer
Spread the strawberry topping evenly over the cheesecake layer, letting those gorgeous red slices shine.
Step 8: Chill the Bars
Refrigerate the assembled bars for at least 3 to 4 hours or overnight until set. This step is crucial for achieving the perfect texture!
Step 9: Slice and Serve
Once set, slice into bars and serve chilled. Each bite melts in your mouth and is bursting with flavor!
Serving Suggestions & Pairings
These No-Bake Strawberry Cheesecake Bars are delicious on their own but can also be paired beautifully with a dollop of extra whipped cream or a sprig of fresh mint for a touch of elegance. Enjoy them alongside a cup of iced tea or a refreshing lemonade for a perfect summer afternoon treat!
Storage & Leftovers Guide
Store any leftovers in an airtight container in the refrigerator for up to 3 days. If you want to prepare them in advance, they can even be frozen for up to a month. Just be sure to let them defrost in the fridge overnight before serving.
Kitchen Wisdom & Success Tips
- Be sure your cream cheese is softened to room temperature for the smoothest filling.
- Press the crust tightly; this will help prevent it from crumbling when you cut into the bars.
- Experiment with other fruits for the topping, such as blueberries or raspberries, for a delicious twist!
Flavor Variations & Adaptations
- Add a bit of lemon zest to the cheesecake filling for a citrusy note.
- Swap out the strawberries for peaches or mangos in the summer.
- Use chocolate graham crackers for an extra-tasty twist on the crust!
Reader Questions & Solutions
-
Can I use a store-bought crust?
- Absolutely! A pre-made graham cracker crust can save time. Just skip the crust-making step.
-
What if I don’t have whipped topping?
- You can use freshly whipped cream, or simply leave it out for a denser cheesecake.
-
Can I make this with low-fat ingredients?
- Yes! Substituting with low-fat cream cheese and whipped topping will work perfectly!
-
How do I prevent the crust from becoming soggy?
- Ensure the butter is evenly distributed when mixing and press the crust firmly into the pan.
-
What if I want to make it dairy-free?
- Use non-dairy cream cheese and coconut whipped cream for a delightful alternative!
Wrapping Up
These No-Bake Strawberry Cheesecake Bars are a celebration of sweet summer flavors and a glorious nod to classic desserts. They’re simple, satisfying, and guaranteed to bring smiles to anyone who takes a bite. So gather your ingredients, don your apron, and indulge in the joy of creating something delicious. Happy baking (or should I say no-baking)! Enjoy every bite of this creamy, dreamy delight!