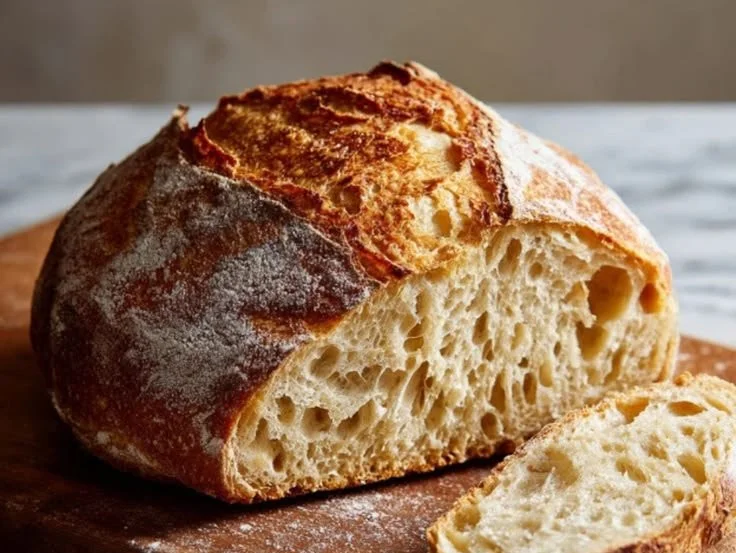
There’s something undeniably magical about the aroma of freshly baked bread wafting through your home. It conjures up images of cozy kitchens and family gatherings, where everyone gathers around a warm loaf, tearing away at the crusty exterior to reveal the soft, pillowy insides. For me, making bread has always been a rite of passage—a blend of simple ingredients that together create something truly spectacular. Today, I’m excited to share with you a recipe that speaks to that connection: No-Knead Artisan Bread.
This recipe is the epitome of simplicity in baking. With just a few ingredients and minimal effort, you can transform your kitchen into a haven of good smells and warm bread. Whether you’re a seasoned baker or someone stepping into the world of bread-making for the first time, this recipe is approachable and rewarding. So, roll up your sleeves, and let’s get started!
Recipe Timing
- Prep Duration: 15 minutes
- Active Cooking: 45 minutes
- Total Duration: 12 to 18 hours and 45 minutes
- Portion Size: Serves 8
- Complexity: Simple
Nutritional Recipe
- Calories per portion: 180
- Protein: 6g
- Carbs: 36g
- Fats: 1g
- Fiber: 2g
- Sugars: 0g
- Sodium: 180mg
Why You’ll Love This No-Knead Artisan Bread
This No-Knead Artisan Bread is not just easy; it’s a game-changer for those who crave homemade bread without the fuss. The long fermentation time allows for rich flavor development, resulting in a crust that’s golden and crispy and a soft, chewy interior. Plus, with minimal hands-on time, you can squeeze it into your busy day. Just imagine serving this warm loaf alongside soups, salads, or enjoying it with a simple spread of butter—pure comfort!
The Complete Cooking Journey
Embarking on this journey will have you mixing, resting, baking, and, finally, savoring the most delectable bread you’ve ever made. Let’s dive right into the process!
Ingredients:
- 3 cups bread flour
- 1/4 teaspoon active dry yeast
- 1 1/2 teaspoons salt
- 1 1/2 cups warm water
- 1 tablespoon olive oil (optional)
- Extra flour for dusting
Method:
Step 1: Combine the Dry Ingredients
In a large mixing bowl, whisk together the bread flour, yeast, and salt until well combined.
Step 2: Add Warm Water
Pour the warm water into the bowl with the dry ingredients. Stir with a wooden spoon or spatula until a shaggy dough forms, ensuring there’s no dry flour remaining.
Step 3: Cover and Ferment
Cover the bowl tightly with plastic wrap. Set it aside at room temperature for 12 to 18 hours until the dough has doubled in size and is bubbly on the surface.
Step 4: Prepare the Dough for Shaping
Turn the risen dough onto a well-floured surface. Gently fold the edges towards the center two or three times to form a loose round shape, then flip it seam-side down.
Step 5: Rest the Dough
Place the shaped dough on a piece of parchment paper and let it rest for 1 to 2 hours, allowing it to puff up slightly.
Step 6: Preheat the Oven
While your dough rests, place a Dutch oven (with the lid) inside the oven and preheat to 450°F for at least 30 minutes.
Step 7: Bake the Bread
Once the oven is preheated, lower the dough into the hot Dutch oven using the parchment paper. Score the top of the loaf with a sharp knife, cover it with the lid, and bake for 30 minutes.
Step 8: Finish Baking
After 30 minutes, carefully remove the lid and bake uncovered for an additional 15 minutes, or until the bread turns a deep golden brown.
Step 9: Cool the Bread
Transfer the baked bread to a wire rack and allow it to cool for at least 30 minutes before slicing. This helps the steam escape and sets the texture.
Serving Suggestions & Pairings
This No-Knead Artisan Bread is perfect for accompanying your favorite soups, salads, or cheese platters. It’s wonderful simply smeared with butter or dipped in good quality olive oil and balsamic vinegar. Imagine serving it alongside a hearty dish of stewed vegetables or a vibrant ratatouille—dipping and savoring every bite.
Storage & Leftovers Guide
Store leftover bread in a paper bag at room temperature for up to 3 days. If you want to keep it longer, wrap it tightly in plastic wrap and freeze for up to 3 months. When ready to eat, thaw and warm it gently in the oven for that freshly baked taste.
Kitchen Wisdom & Success Tips
- For best results, make sure your water is warm but not hot, as too high a temperature can kill the yeast.
- Feel free to experiment! You can enhance the dough by folding in herbs or seeds during the shaping step for added flavor.
- If you struggle with shaping the dough, don’t worry too much about perfection—rustic is beautiful!
Flavor Variations & Adaptations
Add in a tablespoon of your favorite herbs, like rosemary or thyme, for a fragrant twist. Or, try incorporating roasted garlic for a rich, savory flavor. Cheese lovers can fold in grated cheese before shaping for a decadent addition.
Reader Questions & Solutions
-
Why is my bread not rising properly?
Ensure that your yeast is fresh and that the water temperature is warm, not hot. It’s also important to let it sit at room temperature for plenty of time. -
Can I use all-purpose flour instead of bread flour?
Yes, but using bread flour will give you a chewier texture due to its higher protein content. -
What if I can’t find a Dutch oven?
You can use any oven-safe pot with a lid, or even a baking sheet—just cover the dough with a large metal bowl. -
How can I tell when the bread is done?
Look for a deep golden color and a hollow sound when you tap the bottom of the loaf. An instant-read thermometer should read about 200°F when done. -
Can I make this dough ahead of time?
Absolutely! You can prepare the dough up to the shaping stage and then store it in the fridge for up to a few days before final shaping and baking.
Wrapping Up
There you have it—a delightful journey into the world of baking with a No-Knead Artisan Bread recipe that anyone can master. Enjoy the simple pleasure of homemade bread and the moments it brings to your table. So gather your ingredients, let the dough rest, and in just a day, you’ll have an enchanting loaf that fills your home with warmth and delight. Get ready to share this treasure with your loved ones and embrace the joy of baking!
PrintNo-Knead Artisan Bread
Discover the simplicity and richness of this No-Knead Artisan Bread, perfect for any occasion.
- Prep Time: 15 minutes
- Cook Time: 45 minutes
- Total Time: 780 minutes
- Yield: 8 servings 1x
- Category: Bread
- Method: Baking
- Cuisine: American
- Diet: Vegetarian
Ingredients
- 3 cups bread flour
- 1/4 teaspoon active dry yeast
- 1 1/2 teaspoons salt
- 1 1/2 cups warm water
- 1 tablespoon olive oil (optional)
- Extra flour for dusting
Instructions
- Combine the dry ingredients: In a large mixing bowl, whisk together the bread flour, yeast, and salt until well combined.
- Add warm water: Pour the warm water into the bowl with the dry ingredients. Stir with a wooden spoon or spatula until a shaggy dough forms, ensuring there’s no dry flour remaining.
- Cover and ferment: Cover the bowl tightly with plastic wrap. Set it aside at room temperature for 12 to 18 hours until the dough has doubled in size and is bubbly on the surface.
- Prepare the dough for shaping: Turn the risen dough onto a well-floured surface. Gently fold the edges towards the center two or three times to form a loose round shape, then flip it seam-side down.
- Rest the dough: Place the shaped dough on a piece of parchment paper and let it rest for 1 to 2 hours, allowing it to puff up slightly.
- Preheat the oven: While your dough rests, place a Dutch oven (with the lid) inside the oven and preheat to 450°F for at least 30 minutes.
- Bake the bread: Once the oven is preheated, lower the dough into the hot Dutch oven using the parchment paper. Score the top of the loaf with a sharp knife, cover it with the lid, and bake for 30 minutes.
- Finish baking: After 30 minutes, carefully remove the lid and bake uncovered for an additional 15 minutes, or until the bread turns a deep golden brown.
- Cool the bread: Transfer the baked bread to a wire rack and allow it to cool for at least 30 minutes before slicing.
Notes
Store leftover bread in a paper bag at room temperature for up to 3 days, or wrap in plastic wrap and freeze for up to 3 months.
Nutrition
- Serving Size: 1 slice
- Calories: 180
- Sugar: 0g
- Sodium: 180mg
- Fat: 1g
- Saturated Fat: 0g
- Unsaturated Fat: 1g
- Trans Fat: 0g
- Carbohydrates: 36g
- Fiber: 2g
- Protein: 6g
- Cholesterol: 0mg