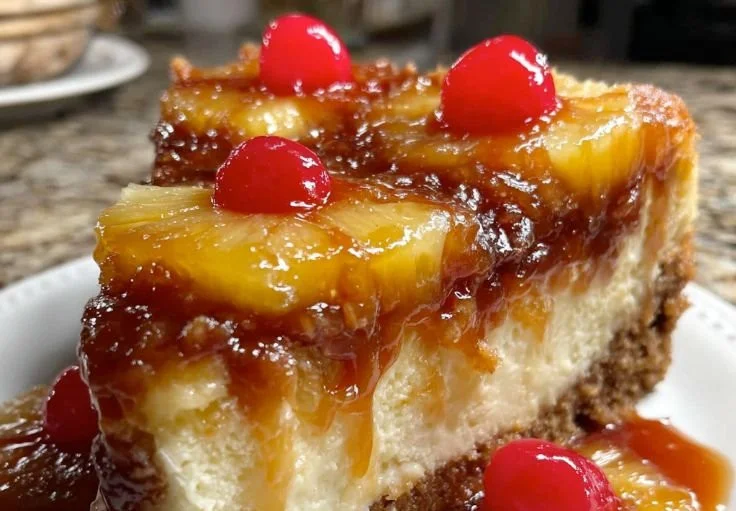
There’s something truly magical about desserts that can evoke nostalgia with just one bite. Pineapple Upside-Down Cheesecake is a beautiful fusion of two beloved classics—cheesecake and the iconic pineapple upside-down cake. As I reminisce about summer picnics where the table would overflow with sweets, one memory stands out: my grandmother lifting a mesmerizing golden cheesecake, its sweet pineapple crowns and juicy cherries glistening under the afternoon sun. This delightful dessert not only dazzled our eyes but also danced on our taste buds. Imagine a velvety cheesecake perched atop a luscious, caramelized layer of pineapple and cherries, all snugly blanketed by a graham cracker crust. It’s the kind of dessert that makes you dream of sunny days, laughter, and indulgence.
Let me take you through the art of making this stunning Pineapple Upside-Down Cheesecake that your family and friends will adore.
Recipe Timing
- Prep Duration: 30 minutes
- Active Cooking: 1 hour
- Total Duration: About 6 hours (including chilling time)
- Portion Size: 12 servings
- Complexity: Moderate
Nutritional Recipe
- Calories per portion: Approximately 400 calories
- Protein: 7 g
- Carbs: 45 g
- Fats: 23 g
- Fiber: 1 g
- Sugars: 29 g
- Sodium: 310 mg
Why You’ll Love This Pineapple Upside-Down Cheesecake
This Pineapple Upside-Down Cheesecake is not just a feast for the eyes; it’s a delightful blend of flavors and textures. The creamy richness of the cheesecake melds seamlessly with the sweetness of caramelized pineapples and cherries. Each slice brings back fond memories while creating new ones, whether it’s for a cozy family gathering or a vibrant summer celebration. Plus, it’s a crowd-pleaser that looks fancy without requiring complicated techniques—perfect for any home cook.
The Complete Cooking Journey
Creating this cheesecake is a wonderful experience that combines simple techniques with rewarding outcomes. With each layer you prepare, you’ll feel an anticipation that builds as you see how beautifully it all comes together. From layering the sweet pineapple rings to whipping up a luscious cream cheese filling, it’s like watching an art piece come to life. And the best part? The joy on your loved ones’ faces when they taste it.
Ingredients
- ¼ cup (≈ 60 g) unsalted butter, melted
- ½ cup (≈ 100 g) packed light or dark brown sugar
- 8–10 canned pineapple rings, drained and patted dry
- 8–10 maraschino cherries, drained
- 1 cup (≈ 110 g) graham cracker crumbs (for the crust layer above pineapple)
- 2 Tbsp granulated sugar
- 24 oz (≈ 675 g) full-fat cream cheese (room temperature)
- 1 cup (≈ 200 g) granulated sugar
- 3 Tbsp all-purpose flour
- ½ cup (120 g) sour cream (room temperature)
- ⅓ cup (≈ 80 ml) pineapple juice, reserved from the drained pineapple
- 2 tsp vanilla extract
- 3 large eggs, room temperature
Method:
Step 1: Prepare the Pan & Pineapple Layer
Preheat the oven to 325 °F (163 °C). Grease a 9-inch springform pan and line the bottom with parchment paper. In a small bowl, combine the melted butter and brown sugar; spread evenly on the bottom of the pan. Arrange the pineapple rings over the butter-sugar layer, placing a cherry in the center of each ring. In another bowl, mix graham cracker crumbs, granulated sugar, and a little melted butter (optional), then sprinkle or press gently over the pineapple layer to form a thin crust above the fruit.
Step 2: Make the Cheesecake Filling
In a large mixing bowl (or stand mixer), beat softened cream cheese until smooth. Add granulated sugar and flour, mixing on low until combined. Add sour cream, pineapple juice, and vanilla extract, mixing until smooth. Add eggs one at a time, mixing on low after each until combined (avoid over-mixing to prevent cracks). Pour the cheesecake filling evenly over the pineapple and crumb layer.
Step 3: Bake & Chill
Bake for 55–65 minutes, or until edges are set and the center is slightly jiggly (it will firm up while cooling). Turn off the oven, prop the door open, and cool the cheesecake in the oven for ~30 minutes. Remove and allow to cool completely at room temperature. Cover and refrigerate for at least 4 hours, ideally overnight, until fully chilled and set.
Step 4: Unmould & Serve
Run a knife around the edge of the pan to loosen. Remove the springform ring and invert the cheesecake onto a serving plate so the pineapple layer faces up. Slice into 12 pieces and serve chilled with optional whipped cream, cherries, or caramel drizzle.
Serving Suggestions & Pairings
This cheesecake pairs wonderfully with a light fruit salad or some homemade whipped cream. For an extra fruity twist, serve it with a scoop of coconut ice cream or a drizzle of caramel sauce. It’s perfect as a sweet ending to a summer barbecue or a festive holiday meal.
Storage & Leftovers Guide
To store this cheesecake, cover it tightly with plastic wrap or aluminum foil and keep it in the refrigerator. It will last about 4–5 days, making it a great make-ahead option for gatherings. If you have leftovers, feel free to freeze individual slices in an airtight container for up to 2 months. Just thaw in the fridge overnight before serving.
Kitchen Wisdom & Success Tips
- Room Temperature Ingredients: Ensure your cream cheese and sour cream are at room temperature for a smooth, lump-free batter.
- Avoid Over-Mixing: When adding the eggs, mix just until combined to prevent cracks on the surface of the cheesecake.
- Cooling Method: Allowing the cheesecake to cool slowly with the oven door ajar helps prevent cracking and ensures a smoother texture.
- Pineapple Rinsing: To avoid excess moisture, be sure to drain and pat the pineapple rings dry before use.
Flavor Variations & Adaptations
For a tropical twist, try adding some shredded coconut to the graham cracker crust or sprinkle some toasted coconut on top before serving. You can also replace the pineapple with strawberries or peaches to create different fruit-inspired versions of this cake.
Reader Questions & Solutions
- Why is my cheesecake cracking? Cracks often form due to over-mixing or rapid temperature changes. Follow cooling methods and mixing instructions carefully.
- Can I use fresh pineapple? Yes—just be sure to cook it down a bit to extract some moisture and sugar so it doesn’t make the crust soggy.
- What if I don’t have a springform pan? You can use a regular cake pan, but be prepared for a bit of a challenge when it comes to serving—lining the sides well with parchment paper can help.
- How can I make it gluten-free? Simply replace graham crackers with gluten-free cookies or a homemade gluten-free crust alternative.
- Can I make this ahead of time? Absolutely! This cheesecake tastes even better after chilling. It’s perfect for making a day or two in advance.
Wrapping Up
There you have it—a delightful Pineapple Upside-Down Cheesecake that marries the best of both dessert worlds into a sweet, tangy, and creamy experience. With each slice, you can transport yourself and your loved ones to brighter days filled with joy and laughter. So grab your ingredients and get ready to create a spectacular dessert that will have everyone asking for seconds! Happy baking!