
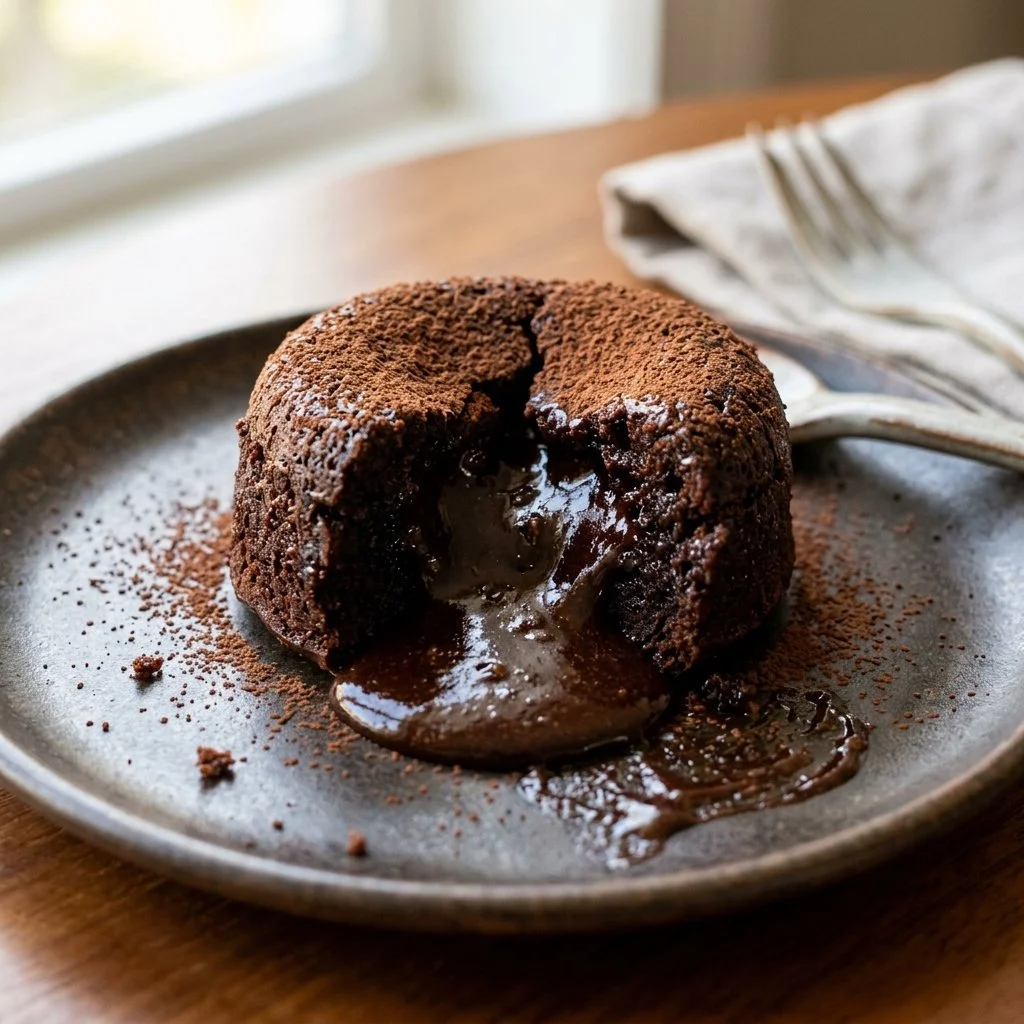
There’s something incredibly magical about the moment you cut into a chocolate lava cake and watch that rich, velvety chocolate ooze out. It’s a scene straight out of a dessert lover’s fantasy, isn’t it? For me, it’s a joyful reminder of cozy evenings spent with friends, laughter spilling over the edges of every chocolatey bite. I remember the first time I attempted to make this dessert; how nervous I was as I watched my friends race to get a spoonful before the luscious filling cooled. That moment is etched in my memory, just like the sumptuous taste of that molten chocolate. Trust me, once you master this simple yet sophisticated recipe, you’ll find reasons to celebrate every day.
Recipe Timing
- Prep Duration: 10 minutes
- Active Cooking: 20 minutes
- Total Duration: 30 minutes
- Portion Size: Serves 4
- Complexity: Simple
Nutritional Recipe
- Calories per portion: Approximately 450
- Protein: 6g
- Carbs: 45g
- Fats: 27g
- Fiber: 1g
- Sugars: 32g
- Sodium: 120mg
Why You’ll Love This Chocolate Lava Cake
This Chocolate Lava Cake is a decadent treat that feels like a warm hug on a plate. Its crispy outer crust gives way to a warm, gooey center filled with melted chocolate. It’s an indulgent dessert that’s surprisingly easy to whip up, and the best part? You can make it in under thirty minutes! Perfect for a romantic dinner, a casual gathering, or even a self-care night. You’ll feel like a pastry chef when you present these beauties, and trust me, your guests will be too busy savoring the rich flavors to know how simple it was to achieve.
The Complete Cooking Journey
Embarking on this chocolate adventure begins with the scent of melting chocolate in the kitchen, followed by mixing, baking, and a little bit of patience. It’s a treat made with love, and nothing beats the satisfaction of serving something homemade that brings joy to those around you!
Ingredients:
- 1 cup dark chocolate chips
- 1/2 cup unsalted butter
- 1 cup powdered sugar
- 2 large eggs
- 2 large egg yolks
- 1 teaspoon vanilla extract
- 1/2 cup all-purpose flour
- Pinch of salt
Method:
Step 1: Preheat the Oven
Preheat the oven to 425°F (220°C). Ensure it reaches this temperature for perfectly baked lava cakes.
Step 2: Prepare Ramekins
Grease four ramekins with butter and dust with cocoa powder. This will prevent sticking and add an extra touch of chocolate flavor.
Step 3: Melt Chocolate and Butter
In a microwave-safe bowl, melt the dark chocolate and butter together until smooth, stirring regularly to avoid burning.
Step 4: Combine the Sugar
Stir in the powdered sugar until well combined, creating a glossy and decadent mixture.
Step 5: Mix in Eggs
Add the eggs and egg yolks to the chocolate mixture, mixing until smooth and fully combined. The richness of the eggs adds depth to the cake.
Step 6: Add Flavor and Flour
Stir in the vanilla, flour, and a pinch of salt until just combined. Be careful not to overmix; you want to keep the texture light and airy.
Step 7: Fill Ramekins
Divide the batter evenly among the prepared ramekins, leaving a little space at the top for expansion while baking.
Step 8: Bake to Perfection
Bake in the preheated oven for 12-14 minutes, until the edges are firm but the center is still soft. It’s crucial to monitor the time closely—undercooking is key here!
Step 9: Cool and Serve
Let the cakes cool for 1 minute, then invert onto plates and serve immediately. A dusting of powdered sugar or a scoop of vanilla ice cream on top makes it even more irresistible.
Serving Suggestions & Pairings
Serve your Chocolate Lava Cake warm with a dollop of whipped cream or a scoop of vanilla ice cream for a delightful contrast of temperature and texture. You could also drizzle some fresh raspberry sauce or top it with berries for a touch of freshness. If you’re feeling really indulgent, pair it with a glass of rich red wine or a shot of espresso to complement the chocolate!
Storage & Leftovers Guide
If you have any leftovers (which is rare!), let the lava cakes cool completely before storing them in an airtight container in the fridge for up to 2 days. Reheat in the microwave for about 20 seconds before serving. However, I recommend you try your best to share them—everyone should experience the warm gooeyness fresh from the oven!
Kitchen Wisdom & Success Tips
- Temperature Matters: Make sure your ramekins are greased well to prevent sticking.
- Watch the Clock: Every oven is different, so keep an eye on the baking time. You want that center to remain gooey!
- Serving Style: Inverting the cakes can be tricky. You can run a knife around the edge to loosen them if necessary.
- Make Ahead: Prepare the batter and fill the ramekins ahead of time, then refrigerate them. Just add a couple of extra minutes to the baking time if baking from chilled.
Flavor Variations & Adaptations
Feeling adventurous? Add a pinch of espresso powder to enhance the chocolate flavor. For a citrus twist, incorporate orange zest into the batter. You could also experiment with different chocolates, such as white chocolate or a mix of dark and milk chocolate for a richer flavor.
Reader Questions & Solutions
-
What if my lava cake doesn’t ooze?
- This usually happens if you bake it for too long. Aim for the recommended time and monitor until the edges are firm yet the center is soft.
-
Can I make this without ramekins?
- Absolutely! You can use a muffin tin, but make sure to adjust the baking time.
-
How do I know when they’re done?
- The edges should be set while the center remains soft. You can gently shake the ramekin to check for movement in the center.
-
Can I freeze these cakes?
- Yes! Wrap the cooled lava cakes tightly in plastic wrap and freeze for up to a month. Bake from frozen, extending the baking time by a few minutes.
-
What’s the best way to serve leftovers?
- For a delicious leftover treat, warm them in the microwave for a few seconds and serve with a scoop of ice cream.
Wrapping Up
There’s an unparalleled joy in creating something from scratch that brings so much happiness to the table. This Chocolate Lava Cake recipe is not only simple to follow but yields a stunning dessert that’s sure to impress friends and family alike. I encourage you to gather your ingredients, preheat that oven, and dive into the rich world of chocolatey goodness. Happy baking!
PrintChocolate Lava Cake
A decadent chocolate lava cake with a gooey, melting center that’s simple to make and perfect for any occasion.
- Prep Time: 10 minutes
- Cook Time: 20 minutes
- Total Time: 30 minutes
- Yield: 4 servings 1x
- Category: Dessert
- Method: Baking
- Cuisine: American
- Diet: Vegetarian
Ingredients
- 1 cup dark chocolate chips
- 1/2 cup unsalted butter
- 1 cup powdered sugar
- 2 large eggs
- 2 large egg yolks
- 1 teaspoon vanilla extract
- 1/2 cup all-purpose flour
- Pinch of salt
Instructions
- Preheat the oven to 425°F (220°C).
- Grease four ramekins with butter and dust with cocoa powder.
- Melt the dark chocolate and butter together in a microwave-safe bowl until smooth.
- Stir in the powdered sugar until well combined.
- Add the eggs and egg yolks, mixing until smooth.
- Stir in the vanilla, flour, and a pinch of salt until just combined.
- Divide the batter evenly among the prepared ramekins.
- Bake in the preheated oven for 12-14 minutes.
- Let the cakes cool for 1 minute, then invert onto plates and serve immediately.
Notes
Serve warm with whipped cream or vanilla ice cream. For storage, refrigerate leftovers in an airtight container for up to 2 days.
Nutrition
- Serving Size: 1 serving
- Calories: 450
- Sugar: 32g
- Sodium: 120mg
- Fat: 27g
- Saturated Fat: 15g
- Unsaturated Fat: 12g
- Trans Fat: 0g
- Carbohydrates: 45g
- Fiber: 1g
- Protein: 6g
- Cholesterol: 210mg