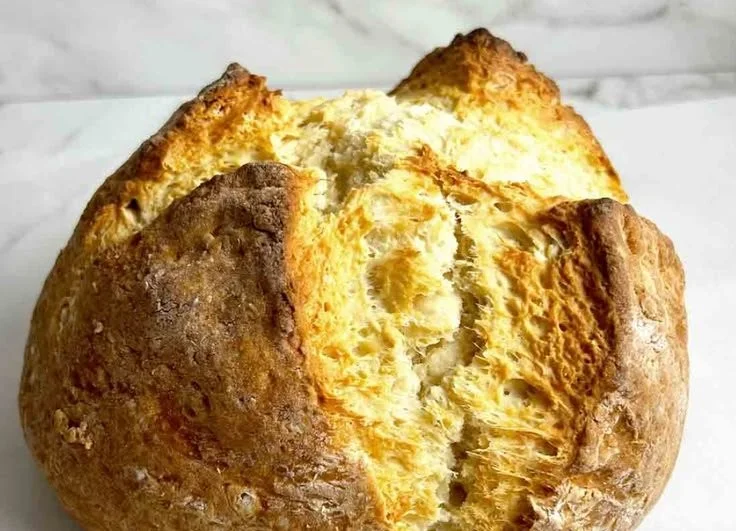
There’s something deeply comforting about the aroma of freshly baked bread wafting through a cozy kitchen. Picture this: it’s a crisp morning, the sun is starting to peek through the clouds, and you decide to treat yourself and your family to the warm delight of homemade Irish soda bread. This uncomplicated recipe gets you from pantry to plate in no time, and I can’t wait to share it with you. Made with just a handful of simple ingredients, each bite evokes a sense of tradition and warmth, reminding us that some of the best things in life are also the simplest.
## Recipe Timing
- Prep Duration: 10 minutes
- Active Cooking: 30-35 minutes
- Total Duration: 45-50 minutes
- Portion Size: Serves about 8 slices
- Complexity: Simple
## Nutritional Recipe
- Calories per portion: Approximately 170
- Protein: 4 grams per serving
- Carbs: 32 grams per serving
- Fats: 3 grams per serving
- Fiber: 1 gram per serving
- Sugars: 1 gram per serving
- Sodium: 210 mg per serving
## Why You’ll Love This The Best Irish Soda Bread
Why is this the best Irish soda bread? It strikes the perfect balance between crusty on the outside and soft on the inside, making it delightful to tear apart. The slight sweetness from the sugar harmonizes beautifully with the tangy buttermilk, while a hint of melted butter adds richness that makes each slice utterly irresistible. And let’s not forget the joy of serving it warm, slathered in butter and perhaps a dollop of your favorite jam. It’s perfect for breakfast, a cozy tea time snack, or as a side for a hearty soup or stew. Trust me, this is one recipe you’ll want to keep on hand.
## The Complete Cooking Journey
This is more than just a recipe; it’s a little adventure. You’ll start by gathering your ingredients and preheating your oven, creating an anticipation that I promise will be well worth it. The mixing of dry ingredients is a straightforward affair, and soon you’ll be pouring in rich buttermilk and melting butter—a moment that’s pure magic! After a gentle knead and a few moments of shaping, it’s off to the oven. You’ll be rewarded with a golden brown loaf that fills your kitchen with warmth and invites everyone to gather and celebrate the simple joy of homemade bread.
## Ingredients:
- 4 cups all-purpose flour
- 1 teaspoon baking soda
- 1 teaspoon salt
- 1 tablespoon sugar
- 1 ¾ cups buttermilk
- 1 tablespoon melted butter
## Method:
### Step 1: Preheat and Prepare
Preheat the oven to 425°F (220°C). Grease a baking sheet to ensure that our lovely loaf doesn’t stick!
### Step 2: Mix the Dry Ingredients
In a large bowl, whisk together the flour, baking soda, salt, and sugar until they’re well combined. This is the foundation of our bread.
### Step 3: Create the Well
Make a well in the center of the dry mixture, a little nest for what’s to come. Pour in the buttermilk and melted butter, and watch how these ingredients will transform our dough.
### Step 4: Combine and Form the Dough
Stir the mixture until a soft dough forms. It might seem a little rough, but that’s just perfect—this bread is all about rustic charm!
### Step 5: Knead Gently
Turn the dough onto a floured surface and knead gently to bring it all together. Too much kneading will make the bread tough, so keep it light and tender.
### Step 6: Shape It Up
Shape the dough into a round loaf. Place it lovingly on the prepared baking sheet; this is your creation now!
### Step 7: Cut the Signature Cross
With a sharp knife, cut a deep cross into the top of the bread. Not only does this allow steam to escape while baking, but it also gives our loaf a beautiful rustic look.
### Step 8: Bake to Perfection
Bake for 30-35 minutes, or until the bread is golden brown and sounds hollow when tapped. Your kitchen will smell sensational by now!
### Step 9: Cool and Serve
Let the bread cool slightly before slicing it up. The best way to enjoy it? Slathered with butter and a spoonful of jam while it’s still warm.
## Serving Suggestions & Pairings
Serve this Irish soda bread alongside a hearty bowl of creamy vegetable soup, or enjoy it at breakfast with eggs and crispy bacon. It pairs beautifully with an afternoon cup of tea or coffee too. Do not miss the chance to jazz it up with your favorite spreads—be it berry preserves or honey!
## Storage & Leftovers Guide
To store any leftovers, wrap the soda bread loosely in a kitchen towel and place it in a bread box or a paper bag. It will stay fresh for about 2 days. If you want to keep it longer, you can freeze slices in an airtight container, where they can last for up to a month. Simply toast them directly from the freezer for a quick treat!
## Kitchen Wisdom & Success Tips
- Remember, the key to this bread is to work gently with the dough. The more you handle it, the denser it gets.
- If you don’t have buttermilk, you can easily make a substitute by adding 1 tablespoon of vinegar or lemon juice to regular milk and letting it sit for 5 minutes.
- Make sure your baking soda is fresh; it’s the leavening agent that gives your bread that lovely rise!
## Flavor Variations & Adaptations
Feel free to add a handful of raisins or currants for a sweet twist! For a savory alternative, try mixing in some herbs like rosemary or thyme. And for a nutty touch, chopped walnuts or seeds can work wonders, too!
## Reader Questions & Solutions
-
Can I replace all-purpose flour with whole wheat flour?
Yes, you can! Keep in mind that the texture will change slightly and you might need to adjust the buttermilk accordingly. -
What if my dough is too dry?
If your dough feels crumbly, don’t panic! Add a little more buttermilk, one tablespoon at a time, until it comes together. -
How can I tell if the bread is done?
It should be golden brown on the outside and sound hollow when tapped on the bottom. -
Can I make this gluten-free?
Absolutely! Use a gluten-free all-purpose flour blend that includes xanthan gum for the best results. -
What’s the best way to serve leftovers?
Toasting slices brings back that fresh-out-of-the-oven feel, adding a delightful crunch.
## Wrapping Up
There you have it—the secret to The Best Irish Soda Bread! This recipe is not just about making bread; it’s about creating moments, sharing smiles, and warming hearts. Whether it’s a quiet morning treat or a festive table centerpiece, this Irish soda bread is certain to bring a touch of magic to your day. So, roll up your sleeves, get mixing, and let the delightful aroma of baking bread create memories in your kitchen! You’ve got this!
PrintThe Best Irish Soda Bread
A simple and comforting homemade Irish soda bread, crusty on the outside and soft on the inside, perfect for any meal.
- Prep Time: 10 minutes
- Cook Time: 35 minutes
- Total Time: 45 minutes
- Yield: 8 slices 1x
- Category: Bread
- Method: Baking
- Cuisine: Irish
- Diet: Vegetarian
Ingredients
- 4 cups all-purpose flour
- 1 teaspoon baking soda
- 1 teaspoon salt
- 1 tablespoon sugar
- 1 ¾ cups buttermilk
- 1 tablespoon melted butter
Instructions
- Preheat the oven to 425°F (220°C). Grease a baking sheet.
- Mix the flour, baking soda, salt, and sugar in a large bowl until combined.
- Create a well in the center of the mixture, pour in the buttermilk and melted butter.
- Stir until a soft dough forms.
- Knead gently on a floured surface to combine.
- Shape the dough into a round loaf and place on the baking sheet.
- Cut a deep cross into the top of the bread.
- Bake for 30-35 minutes until golden brown.
- Cool slightly before slicing and serving.
Notes
Serve warm with butter and jam. Store in a kitchen towel for up to 2 days or freeze for up to a month.
Nutrition
- Serving Size: 1 slice
- Calories: 170
- Sugar: 1g
- Sodium: 210mg
- Fat: 3g
- Saturated Fat: 1g
- Unsaturated Fat: 2g
- Trans Fat: 0g
- Carbohydrates: 32g
- Fiber: 1g
- Protein: 4g
- Cholesterol: 5mg