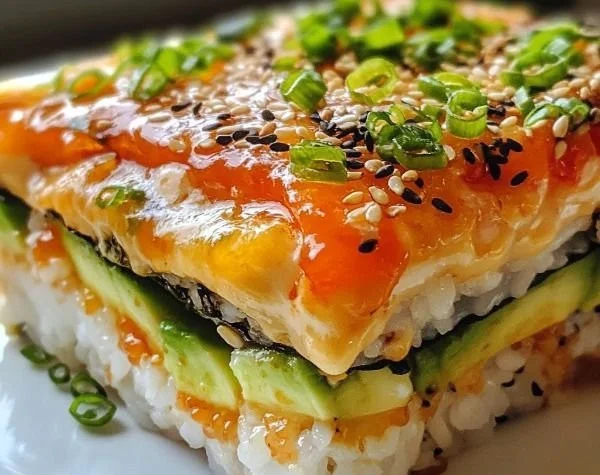
There’s something exceptionally comforting about a cozy night in, curled up on the couch with good food and great company. Recently, I found myself reminiscing about our family sushi nights. We gathered around the table, rolling and laughing, transforming fresh ingredients into little masterpieces of flavor. But as life often gets busy, I discovered a way to conjure that same joy without the intricate rolling process: enter the sushi bake. Imagine all the delicious tastes of sushi baked into a warm, cheesy casserole-like delight. It’s essentially a sushi lovers’ dream come true!
Recipe Timing
- Prep Duration: 20 minutes
- Active Cooking: 10 minutes
- Total Duration: 30 minutes
- Portion Size: Serves 4-6
- Complexity: Simple
Nutritional Recipe
- Calories per portion: Approximately 450
- Protein: 25 grams
- Carbs: 55 grams
- Fats: 18 grams
- Fiber: 2 grams
- Sugars: 1 gram
- Sodium: 650 mg
Why You’ll Love This Sushi Bake
This sushi bake combines all the best elements of traditional sushi—fluffy rice, creamy sauces, fresh seafood—into a warm and inviting dish that screams comfort. It’s an easy and crowd-pleasing recipe that not only brings the flavors of your favorite sushi restaurants right into your home but also makes for a fun communal dining experience. Plus, it’s versatile! You can experiment with your favorite seafood or add in some vegetables for extra crunch.
The Complete Cooking Journey
Let’s dive right into making this delightful dish together. The promise of a warm, bubbling sushi bake is just a few steps away!
Ingredients:
- 2 cups sushi rice
- 2 1/2 cups water
- 1/4 cup rice vinegar
- 1 tablespoon sugar
- 1/2 teaspoon salt
- 1 cup mayonnaise
- 2 tablespoons sriracha (optional)
- 1 pound fresh seafood (like shrimp, crab, or tuna), cooked and chopped
- 1 sheet nori, cut into strips
- Green onions, for garnish
- Sesame seeds, for garnish
Method:
Step 1: Preheat the Oven
Preheat the oven to 350°F (175°C). Getting that heat going early is key to a perfectly baked end result.
Step 2: Prepare the Sushi Rice
Rinse sushi rice under cold water until the water runs clear, then cook it according to package instructions with 2 1/2 cups of water. This method ensures the rice is fluffy and sticky—perfect for sushi-style dishes.
Step 3: Season the Rice
Once cooked, let the rice cool slightly, then mix in rice vinegar, sugar, and salt. This seasoning adds the essential sushi flavor and balances the sweetness.
Step 4: Create the Mayo Mixture
In a bowl, combine mayonnaise and sriracha (if using). This creamy blend will elevate our bake with a slight kick.
Step 5: Layer the Ingredients
In a baking dish, spread a layer of the seasoned rice evenly at the bottom. Press gently to ensure it all holds together nicely.
Step 6: Add Seafood
Add a layer of chopped seafood on top of the rice, followed by a layer of the mayo mixture. Feel free to get creative with your seafood choices!
Step 7: Repeat the Layers
Repeat layers as desired, finishing with the mayo on top. This ensures every bite is packed with flavor.
Step 8: Bake to Perfection
Bake in the preheated oven for about 15-20 minutes or until heated through and lightly browned. You want that top to be golden and irresistible!
Step 9: Garnish Beautifully
Remove from the oven, garnish with nori strips, green onions, and sesame seeds. This not only adds to the flavor but also gives it a lovely presentation.
Step 10: Serve Warm and Enjoy!
Serve warm and enjoy! Grab a spoon (or chopsticks) and dig in!
Serving Suggestions & Pairings
This sushi bake is perfect on its own, but don’t stop there! Serve it with a side of pickled ginger, wasabi, or a refreshing cucumber salad to lighten the meal. And if you’d like something to drink, try pairing it with a chilled sake or a light, citrus-infused sparkling water.
Storage & Leftovers Guide
If you find yourself with leftovers (which is unlikely but possible!), store them in an airtight container in the fridge. It should be good for about 3 days. Simply reheat in the oven or microwave before serving.
Kitchen Wisdom & Success Tips
- Don’t rush rinsing the rice; it’s crucial for achieving that desired texture.
- Feel free to experiment with different types of seafood or even add veggies like avocado or carrots to the layers for added nutrition.
- For a vegan version, substitute the seafood with tofu or sautéed vegetables.
Flavor Variations & Adaptations
- Experiment with spicy mayo by adding more sriracha or a splash of soy sauce for an umami boost.
- If you’re a fan of fruit, try adding diced mango or avocado for a sweet addition.
- For a crunchier topping, sprinkle some panko breadcrumbs mixed with a touch of olive oil on top before baking.
Reader Questions & Solutions
-
Q: Can I use brown rice instead of sushi rice?
A: Brown rice can be used, but expect a longer cooking time and a different texture. Adjust the water accordingly. -
Q: Is this dish gluten-free?
A: Yes, as long as you use gluten-free mayonnaise and check the ingredients on the rice vinegar. -
Q: What if I don’t like seafood?
A: You can easily substitute with cooked chicken, grilled vegetables, or even some tofu for a vegetarian option! -
Q: Can I prepare this in advance?
A: Yes, you can assemble it up to a day in advance, cover it tightly, and refrigerate until you’re ready to bake. -
Q: How can I make this dish spicier?
A: Add more sriracha to the mayo mix or sprinkle some chili flakes on top before baking!
Wrapping Up
Sushi bake is more than just a recipe; it’s a celebration of flavors that pairs wonderfully with laughter, friends, and family. It turns the act of eating sushi into a shared experience that’s both satisfying and enjoyable. So roll up your sleeves, gather your loved ones, and let this beautiful dish fill your home with warmth and delightful aromas. Happy cooking!
PrintSushi Bake

A warm, cheesy casserole-like delight that captures all the delicious tastes of sushi in an easy-to-make dish.
- Prep Time: 20 minutes
- Cook Time: 10 minutes
- Total Time: 30 minutes
- Yield: 4 servings 1x
- Category: Main Course
- Method: Baking
- Cuisine: Japanese
- Diet: Pescatarian
Ingredients
- 2 cups sushi rice
- 2 1/2 cups water
- 1/4 cup rice vinegar
- 1 tablespoon sugar
- 1/2 teaspoon salt
- 1 cup mayonnaise
- 2 tablespoons sriracha (optional)
- 1 pound fresh seafood (like shrimp, crab, or tuna), cooked and chopped
- 1 sheet nori, cut into strips
- Green onions, for garnish
- Sesame seeds, for garnish
Instructions
- Preheat the oven to 350°F (175°C).
- Rinse sushi rice under cold water until the water runs clear, then cook it according to package instructions with 2 1/2 cups of water.
- Once cooked, let the rice cool slightly, then mix in rice vinegar, sugar, and salt.
- In a bowl, combine mayonnaise and sriracha (if using).
- In a baking dish, spread a layer of the seasoned rice evenly at the bottom.
- Add a layer of chopped seafood on top of the rice, followed by a layer of the mayo mixture.
- Repeat layers as desired, finishing with the mayo on top.
- Bake in the preheated oven for about 15-20 minutes or until heated through and lightly browned.
- Remove from the oven, garnish with nori strips, green onions, and sesame seeds.
- Serve warm and enjoy!
Notes
Store leftovers in an airtight container in the fridge for about 3 days. Reheat in the oven or microwave before serving.
Nutrition
- Serving Size: 1 serving
- Calories: 450
- Sugar: 1g
- Sodium: 650mg
- Fat: 18g
- Saturated Fat: 3g
- Unsaturated Fat: 12g
- Trans Fat: 0g
- Carbohydrates: 55g
- Fiber: 2g
- Protein: 25g
- Cholesterol: 60mg